CEDRA-DxfExportTM
DXF Exporting
CEDRA-DxfExportTM is an ArcView®
GIS and ArcGIS® extension, that is included with all of the
CEDRA AVseriesTM software or
licensed as a separate extension, which enables the user to create
an AutoCAD Drawing Interchange File (DXF file) for all visible
features in the current map from within ArcView 3.x, ArcGIS 9.x and ArcGIS 10.x.
ArcView GIS users are able to perform the export from within a
View document or a Layout document, while ArcGIS users can perform
the export from within either a Data Frame or the Layout view.
ArcGIS users are also able to export the symbology that is assigned
to features, as well as north arrows, provided that a character
in a True Type Font is used to represent the symbol or north arrow. Furthermore,
ArcGIS users are able to export line symbols containing arrow heads and
character markers. As such dimension lines and utility lines, water, electric, sewer can
be exported maintaining their ArcGIS symbology.
The CEDRA-DxfExport software provides users the ability to map ArcMap RGB colors to specific
AutoCAD colors as well as map ArcMap layers or classifications to specific AutoCAD
linestyles. This capability provides for excellent conversions since ArcMap colors and
line styles are converted to their desired corresponding AutoCAD equivalents.
Additionally, the CEDRA-DxfExport software can be executed in a batch environment
for processing multiple ArcMap document files. That is to say, it is possible to
perform a DXF conversion by issuing a command line in a Command Prompt or DOS Window. Taking
it a step further, a batch file can be created where multiple DXF conversions can be
performed. For those who have programming expertise, this batch processing functionality
can be embedded in user created applications be they desktop or web based.
The CEDRA-DxfExport software is also an excellent tool for producing Nuvolo compliant DXF files.
CEDRA-AVcad can be used to create the polygons representing the rooms as well as the annotation
representing the room names and room numbers. Once this has been done, the Create DXF File command
within CEDRA-DxfExport can then be employed to create the Nuvolo compliant DXF file.
ArcGIS users should check out the CEDRA-ArcView3-Tools
toolbar. This toolbar offers a number of selection tools which
will increase productivity by at least 30%. This is accomplished
by reducing the number of clicks that are made in performing typical
selection operations. ArcGIS users who have previously worked
with ArcView GIS will definitely appreciate these tools.
In addition to being included with all of the CEDRA AVseriesTM software, The CEDRA-DxfExport software is also included with all of the CEDRA Demo Packs. For those interested in primarily being able to create DXF files from within ArcView 3.x or ArcMap, CEDRA recommends the CEDRA AVcadTM software as the solution. Note that there is no limit to the number of DXF file creations that can be performed with the CEDRA-DxfExport software, which is included with the CEDRA Demo Packs.
For those who do not wish to license a CEDRA Demo Pack but still want to see how the DXF file creation works, simply e-mail a sample shapefile, Personal or File GeoDatabase you would like processed to cedra@cedra.com, with the subject line CEDRA-DxfExport Software Inquiry. Please include your name and company/agency in the e-mail. Upon completion of the DXF file creation, the results will be e-mailed back to you for your review. After which we can discuss the results of the export to see if the desired results were obtained.
Those interested in a lot more functionality for just a little more expense should check out the CEDRA-AGsuite software package.
Click on this link for a CEDRA-DxfExport order form. Site licenses of the software are available.
Click on this link for a color brochure,
which can be viewed and/or printed with Adobe Acrobat® ReaderTM.
CEDRA DxfExportTM
CEDRA DxfExportTM is fully compatible with Versions 3.0, 3.1, 3.2 and 3.3 of ArcView® GIS and Versions 9.3, 10.0, 10.1, 10.2, 10.3, 10.4, 10.5, 10.6 and 10.7 of ArcGIS®.
Accessing the CEDRA-DxfExport software:
ArcView GIS users should load the CEDRA-DXF-Export extension
using the {File} [Extensions...] command. Once the extension has
been loaded, a menu item called DXF Export will appear. This menu
item contains a sub menu item called Create DXF File.
ArcGIS users should add the ced2dxf.dll file, located in
the CEDRA distribution directory \cedra\arcmap, with the Add From
File button within the {Tools} [Customize] dialog box. Once the
ced2dxf.dll has been added, a toolbar called CEDRA-ArcMap2DXF-Tools
will be available for use. This toolbar contains a combo-box with
a menu item called Create DXF File which is the command that performs the export. The
combo-box also contains a number of other useful commands that assist in the
exporting work-flow.
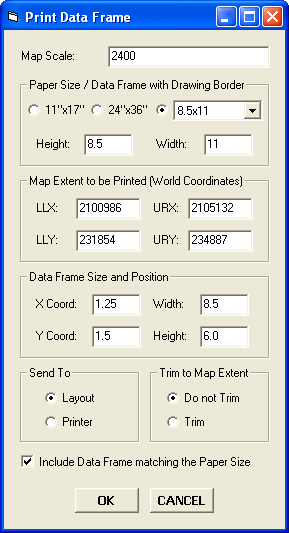
Upon activation of the Create DXF File command a dialog box as
shown below will appear. Generation of the DXF file is made by
filling in the appropriate information displayed in the dialog
box and clicking the OK button.
Software Functionality:
Unlike other DXF export utilities, which process only one theme
at a time, the CEDRA DxfExportTM
extension processes all visible themes (shapefiles, personal geodatabases,
file geodatabases, enterprise geodatabases and coverages) in the
current map. For ArcView GIS users, the export can be performed
from within a View document or a Layout document, while for ArcGIS
users, the export can be performed from within a Data Frame or
the Layout view. Furthermore, the CEDRA DxfExport utility will
process annotation features and graphic text elements. As such,
a DXF file created by this utility can include features and text.
Additionally, for ArcGIS users point features which are symbolized
using a character in a True Type Font will have the symbology
exported as a series of hatches (polygons) in the DXF file. This
enables the user to create a DXF file that contains the same look
of the symbol as displayed in ArcMap.
In processing the visible feature and annotation layers in the
map, note the following:
- If a theme has selected features then only the selected features will be processed, if there are no selected features then all features in the theme will be processed, this includes point, polyline and polygon features. If the option Export Features displayed in the Current Extent is selected then all visible features in the current view will be exported regardless of the feature's selection state.
- If a theme has labels, the labels will need to be converted into annotation, using the Convert Labels to Annotation... command, in order for the labels to be exported. The labels that are converted can be stored either in a personal geodatabase or in the map, depending upon the user's preference.
- If there are selected MARKER, PEN, FILL and/or TEXT graphic
elements then these graphic elements will be processed (if the
user desires). If the view does not contain any selected graphic
elements then no graphic elements will be processed. In exporting
graphic elements note the following:
- All of the selected Marker elements will be placed in a layer called GrapMrkr,
- All of the selected Pen elements will be placed in a layer called GrapPen,
- All of the selected Fill elements will be placed in a layer called GrapFill, and
- All of the selected Graphic Text elements will be placed in a layer called GrapText.
- The name of the theme will serve as the name of a layer in the DXF file.
- Non-alphanumeric characters in a theme name are converted to the underscore character (_).
- The user has the ability to select one or more attributes, from a choice box that appears in the Create DXF File dialog box, for inclusion in the DXF file, if desired. When exporting attributes, the selected attributes will appear as "blocks" in the DXF file. These blocks will appear at the midpoint of the feature and the name of the block will be Blkxxxx, where xxxx denotes the name of the layer the feature resides in. All of the attributes associated with the block will be listed vertically, one under the other. Additionally, the block will be placed in a layer called Blkxxxx_BLK, where xxxx denotes the name of the layer the feature resides in. The ability to export attributes is important because: (a) it enables the user to transfer non-graphic information (attributes) into the DXF file, maintaining the association of the non-graphic information with the feature and (b) provides a mechanism for the user to maintain symbology and line styles. Regarding the latter, symbology and line styles, in the GIS classifications are based upon attributes, by exporting the attributes which the classifications are based upon, the user has the ability to regenerate the classifications in the system in which the DXF file is being read into. This, of course, is dependent upon the software which is reading the DXF file, that it has the ability to change symbology and line style using information that is stored in a "block". By placing the blocks in their own layer, the user is able to control the visibility and color of the layer.
| ArcMap - CEDRA-DxfExport Dialog Box |
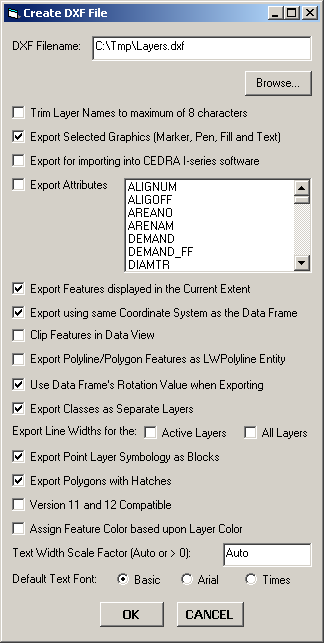 |
As can be seen by examining the dialog box above, the user is able to:
- Control the name of the DXF file that is created. The Browse... button enables the user to use a standard file navigation dialog box to control the folder where the DXF file will be written to, as well as the name of the DXF file.
- Specify whether the theme names are to be trimmed to 8 characters or not. If a check appears in the square to the left of this parameter, the names of the visible themes that are processed will be trimmed to a maximum of 8 characters. The first 8 characters of the theme name will be used.
- Specify whether selected graphic elements are to be included in the DXF file creation. If a check appears in the square to the left of this parameter any graphic elements that are selected will be included in the creation of the DXF file.
- Specify whether a DXF file for importing into the CEDRA I-series software is to be created or not.
- Specify which attributes if any are to be included in the DXF file as "blocks". If a check appears in the square to the left of this parameter all attributes which are selected in the choice box will be included in the DXF file as "blocks". There is no limit to the number of attributes that can be selected, and
- Specify whether the visible features in the current extent (view) are to be processed. If a check appears in the square to the left of this parameter then the only features that will be exported will be the visible features in the current extent, regardless of their selection state. In addition, if the Export Selected Graphics (Marker, Pen, Fill and Text) option is selected, all Marker, Pen, Fill and Graphic Text elements in the visible annotation group layers which are within the current extent will be exported, regardless of their selection state. The name of the annotation group layer will serve as the name of the layer these graphic elements are placed in.
- Specify whether the data that is exported is to appear in the same coordinate system as the current view (data frame) or not. If this option is not checked, the data that is exported will be in the coordinate system of the theme's (layer's) source data. If this option is checked, all data that is exported will be in the same coordinate system as currently displayed in the data frame.
- Specify whether features are to be clipped to the current map display extent when exporting from Data View. If this option is not checked, if any portion of a feature falls within the current map display extent, the entire feature will be exported. If this option is checked, the feature will be clipped to the current map display extent prior to exporting.
- Specify whether polyline and polygon features are to be exported as LWPolyline AutoCAD entities. If this option is checked, all polyline and polygon features will be exported as a LWPolyline entity, rather than a Polyline or Polygon entity. If a polyline forms a closed figure then a closed LWPolyline entity will be exported.
- Specify whether or not the data frame's rotation value is to be applied to the feature that are being exported. This parameter only has an effect when the data frame has a rotation value assigned to it. When this parameter is checked (active), the exported features will be rotated to reflect the data frame's rotation value. If this parameter is not active, the exported features will be unrotated.
- Specify whether the classes which comprise a layer's classification are to be exported as separate layers or not. When checked, the name of the class that the feature resides in will be used as the feature's layer name in the DXF file not the name of the layer. If unchecked, all classes in a layer's classification will be exported using the name of the layer. If the layer has not been classified then the name of the layer is used.
- Specify whether the command should export line width values for the active layers. In so doing, the user is able to differentiate between skinny and thick lines. The layers to be processed must be selected prior to activating the command.
- Specify whether point symbols that appear in a point layer's classification are to be exported using block definitions or not.
- Specify whether polygons should be exported as hatches or as closed polylines without a hatch.
- Specify whether the command should create a DXF file that is compatible with AutoCAD Versions 11 and 12. Note that versions 11 and 12 do not support hatches so that filled polygon in ArcMap will appear as closed polylines in the DXF file (that is, no fill).
- Specify whether the color of the feature exported is to be based upon the layer color or the color of the classification. If this option is not checked, the color of the feature will need to be changed on a feature basis rather than a layer basis.
- Specify a specific Text Width Scale Factor or indicate that a program computed scale factor is to be used when exporting graphic text and annotation features (Code 41 in the DXF file).
- Specify the default font that should be assigned to the text elements. If the Version 11 and 12 Compatible option is checked the Basic font will be automatically assigned. The Arial and Times options are available only when the Version 11 and 12 Compatible option is not checked.
Special Notes:
- Users who are working with SDE databases typically use labels as the mechanism for creating annotation. In order for these labels to appear in the DXF file, the user must convert the labels into annotation using the [Convert Labels to Annotation...] command. This command is available in a pop-up menu list by "right-clicking" on the name of the layer in the Table of Contents. The annotation which is created by this command can be stored either: (a) in the document as graphic text elements or (b) in a feature class as annotation features within a database depending upon the user's preference. If the annotation is stored in the document, an Annotation Group layer will be created containing the newly created graphic text elements. The name of the Annotation Group layer will be used as the name of the layer in the DXF file.
- In dealing with colors, the CEDRA-DxfExport software will try to find the closest AutoCAD color that matches the ArcView or ArcMap color. This is accomplished by finding the colors which have the closest Red, Green, Blue color values. In so doing when the DXF file is imported it will resemble as close as possible its appearance in ArcView or ArcMap. For a specific mapping of colors review the Color Mapping section below. The ability to map a specific ArcMap RGB color to an AutoCAD color is described in this section.
- When processing features, which have Z information associated with their geometry, that is, 3D features, the Z value will appear in the DXF file.
- ArcView GIS users in addition to being able to use the [Create DXF File] command in a View document are able to use the command from within a Layout document. As such, the user is able to export layouts to a DXF file.
- ArcView GIS users when performing an export from a Layout document can activate the option Convert all non View Frames to Graphics (Layout mode) to have the software include all of the scale bar and north arrow frames in the DXF file. If this option is not activated, these types of frames will not be included in the DXF file.
- ArcGIS users in addition to being able to use the [Create DXF File] command in a Data Frame are able to use the command from within the Layout View.
- ArcGIS users are able to export Callout elements from both Data View and Layout View.
- ArcGIS users when exporting from Layout View will have the Data Frame's border exported if one is associated with the Data Frame.
- ArcGIS users when exporting from Layout View will need to convert the Map Grid (if one exists) to a Grouped Element using the Convert to Graphics button under the Grids tab of the {View} [Data Frame Properties...] dialog box in order for the Map Grid to appear in the DXF file.. A Map Grid will not be exported if it has not been converted to a graphic element.
- ArcGIS users exporting from Layout View will notice that North Arrows will be exported either as a: (a) rectangle denoting the size and position of the north arrow or (b) a series of hatches (polygons) representing the appearance of the north arrow.
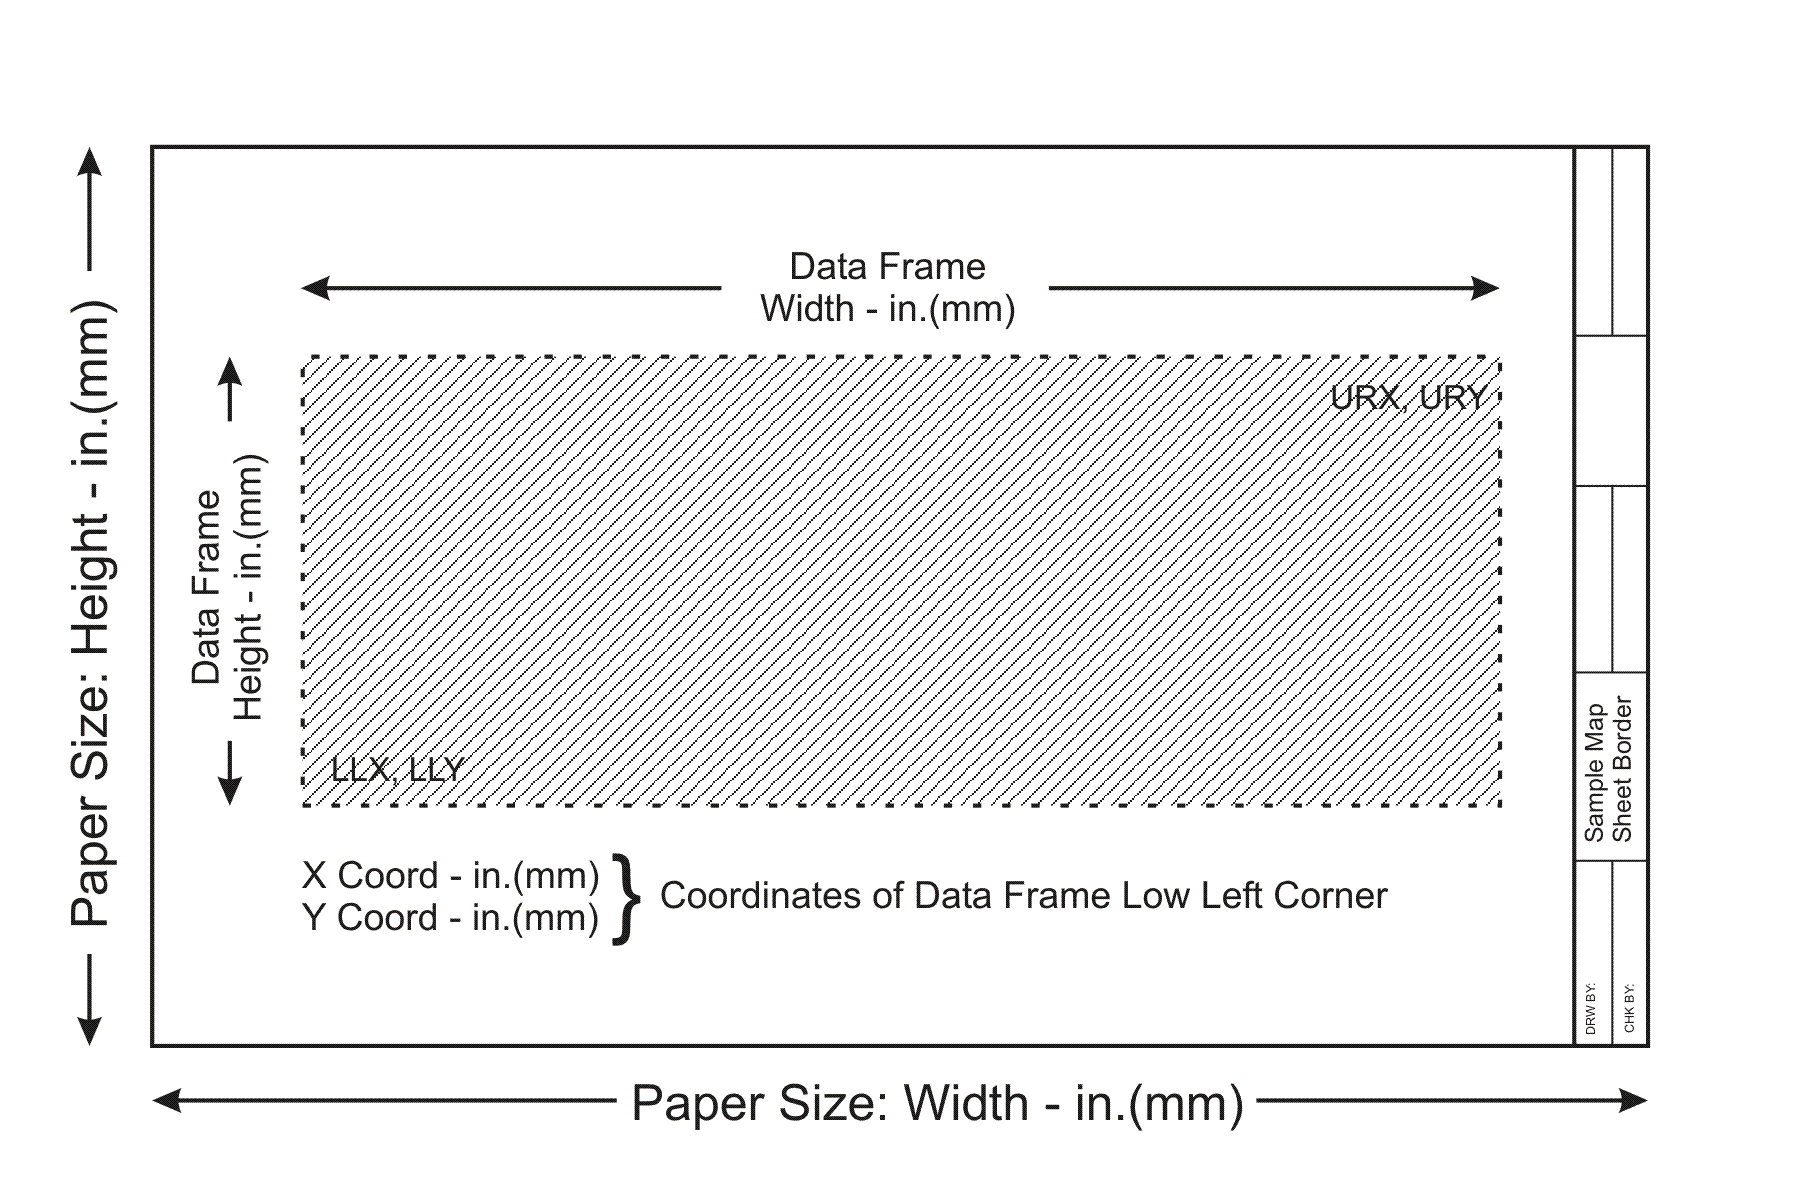
- ArcGIS users when exporting a single Data Frame from Layout view will notice that in addition to the .dxf file being created, a world file (.wld) will also be created. The world file contains two lines of data with four values on each line separated by a comma. These lines contain the sheet and world coordinates for the NW and SE corners of the data frame that was processed. The first line in the file pertains to the NW corner, while the second line pertains to the SE corner This file can be used to georeference the DXF file.
- When exporting Arc/Info coverage annotation, the degree symbol will appear as the typical degree symbol and not as the ^ character in the DXF file.
- When exporting multi-line graphic text elements, (text which is comprised of more than 1 line of text), the CEDRA-DxfExport software will honor the alignment and leading of the text. That is, if the graphic text is right justified, centered, left justified or fully justified, the text in the DXF file will reflect this justification, as well as, the spacing between the lines of text.
- When the option Export using same Coordinate System as the Data Frame is activated (checked) all of the data that is exported will be in the same coordinate system currently applied to the data frame (view). If this option is not activated, then each theme (layer) that is exported will appear in the coordinate system of the theme's (layer's) source data. As such, when this option is not checked it is possible for the layers to not overlay upon each other as may be expected. This condition will occur when the coordinate system of the data source for the themes (layers) being exported are not all the same.
- SDC data, which is an ESRI compressed data format, must be converted into a shapefile or geodatabase feature class prior to being exported. That is to say, SDC data can not be directly exported.
- ArcGIS users should note that Data Frames which have a rotation angle applied to them will be exported taking into account the rotation angle when the option Use Data Frame's Rotation Value when Exporting is activated (checked). If this option is not checked, the features exported will not reflect the rotation angle applied to the data frame.
- Canadian users using PCs with the French language will need to modify the CONFIG.TXT file located in the \cedra\avprjs folder by changing the decimal point (.) in all numbers which appear to the left of the /* characters with a comma (,). For example, the number 5.0 will need to be changed to 5,0 in order for the CONFIG.TXT file to be read properly.
- Canadian users when exporting from Layout View should define the Paper Size in terms of millimeters, not centimeters.
- The maximum number of characters that can appear in a layer name or a block name is 31.
- Raster and Bitmap images are not processed by the software. In addition, line symbology will not be exported. So that, lines with a pattern will appear as a simple line. Furthermore, points that are not represented as a character in a True Type Font will appear as a simple point.
- ArcGIS Dimension features will be exported as individual line and text elements in the DXF file. That is to say, an ArcGIS dimension feature is decomposed into the individual elements comprising the feature.
- Not all graphic element types are supported in the ArcGIS version. The basic graphic elements: points, lines, polygons and annotation are supported. If the user wishes to test a certain graphic element simply send a sample for us to test.
Color Mapping:
For those who need to ensure that the ArcMap color is properly
exported to the AutoCAD environment, the CEDRA-DxfExport software
allows the user to define an ArcMap to AutoCAD color mapping scheme.
The CEDRA-DXF Color Mapping file, rgbmap.txt, can be edited
by the user to map a specific AutoCAD color to a specific ArcMap
color. Any word processor or text editor can be used to perform
the editing.
An ArcMap color is defined in terms of its RGB value. The [Layer
RGB Values] command, included with the CEDRA-DxfExport software,
can be used to ascertain the RGB color value. To use this command,
the user activates in the Table of Contents the layer to be processed
(one layer is processed at a single time). Upon selection of the
command, a list message box is displayed containing the RGB values
for each classification comprising the layer.
A portion of a sample CEDRA-DXF Color Mapping file is shown below. Note that the /* characters denote a comment line, which the user can insert freely within the file. Comment lines can be used to improve the readability of the file. There is no limit to the number of colors that can be mapped.
/* Identify the AutoCAD color
to be used for a specific ArcMap color
/* Each data line contains two values:
/* Value 1: ArcMap RGB color value (use Layer RGB Values command
to determine)
/* Value 2: AutoCAD color number (value between 1 to 255, inclusive)
/*
/* BLACK
/*
33613542 255
33554432 255
33580677 255
13160660 255
/*
/* LIGHT BLACK
/*
38686286 252
/*
/* BROWN
/*
33580677 34
/*
/* BLUE
/*
50294784 5
50107146 5
49470359 5
48651264 5
45107456 5
16752896 5
/*
/* GREEN
/*
33619797 3
33597496 3
/*
/* YELLOW
/*
33619967 2
33613542 2
/*
/* CYAN
/*
50316544 4
50323315 4
/*
/* RED
/*
34682106 1
33554687 1
33554662 1
33554600 1
33554432 1
/*
/* MAGENTA
/*
49962223 6
46465279 6
44630246 6
/*
/* GRAY
/*
46976204 253
48357857 253
/*
/* LIGHT GRAY
/*
48357857 254
45265586 254
/*
/* TAN
/*
46257655 31
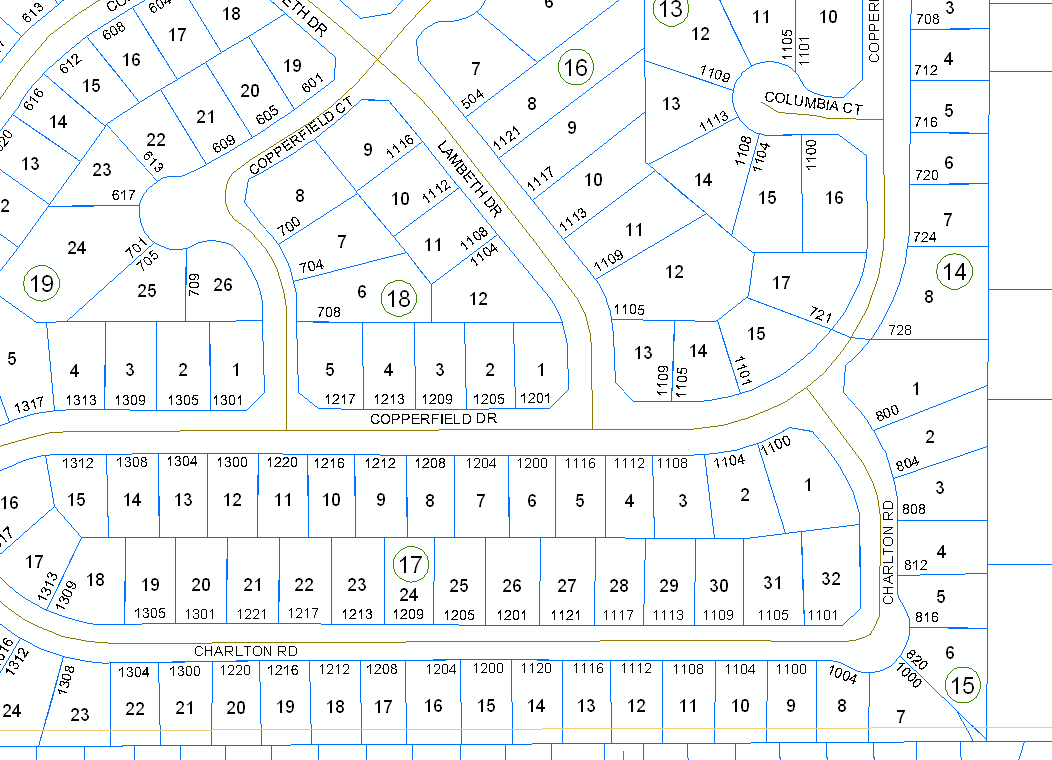
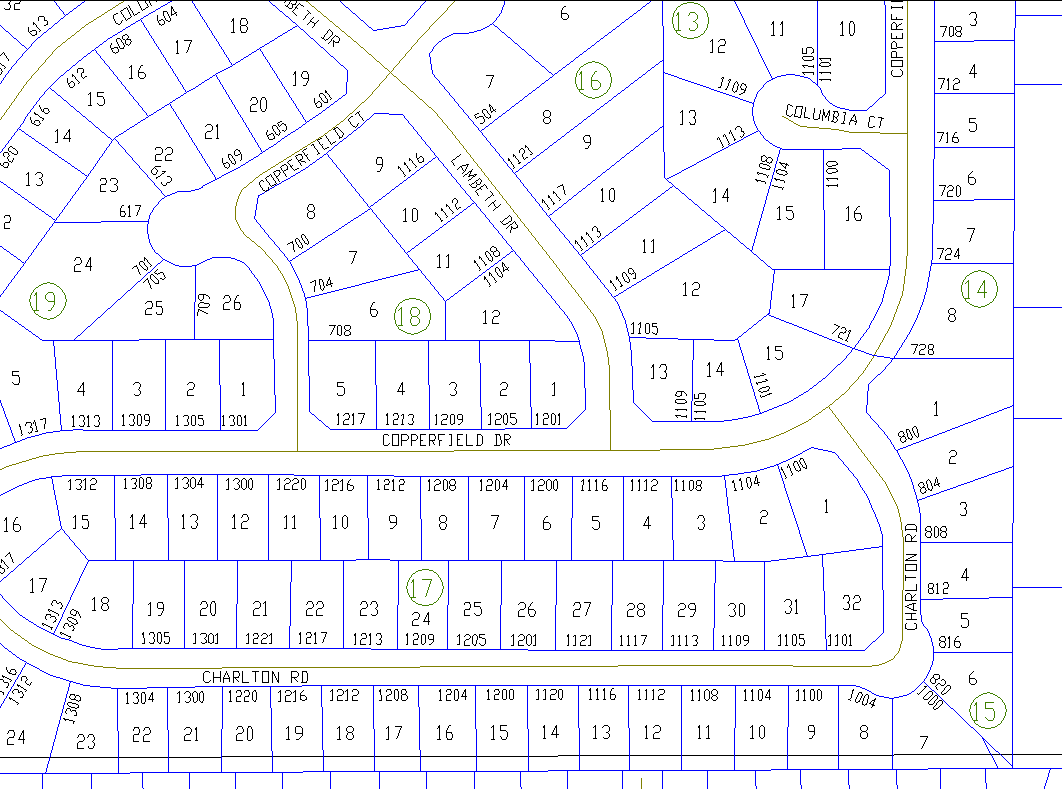
Example of a Typical DXF File Export
|
|
 |
|
|
 |
|
|
|
 |
 |
Extra Functionality included with the CEDRA-DxfExport Software
For ArcGIS users, included with the CEDRA-DxfExport software are the CEDRA-DataFrame-Tools and CEDRA-ArcView3-Tools toolbars. Although not required in the creation of a DXF file, these additional toolbars enhance the interaction of the user with ArcMap by (a) facilitating the printing of maps and (b) the processing of layers and features within the map. Below is a description of these toolbars and the functionality they provide.
Printing Capability for ArcGIS
ArcGIS® users have the ability to print the active data
frame using the Print Data Frame command, which is available in
the CEDRA-DataFrame-Tools toolbar. The Print Data Frame command
differs from conventional ArcGIS printing in that the user is
able to control: (a) the map scale, (b) the map area to be printed,
(c) the location of the map on the paper and (d) optionally, whether
a data frame, which contains a map sheet border, should be included
or not in the map.
As most ArcMap users have realized, within an ArcMap document
file (.mxd) all data frames share the same layout. This causes
the difficulty of when the layout view is activated all of the
data frames in the document file appear in the layout, which for
some applications is not what the user wants. The Print Data Frame
command will print the active data frame, from data or layout
view, ensuring that: (a) the desired map scale is preserved, and
(b) all other data frames do not appear on the plot. This is achieved
by programmatically positioning all data frames, other than the
active data frame, in the document file outside of the user specified
sheet limits (Paper Size parameters). In so doing, when the layout
view is activated the only data frame that appears in the layout
view is the active data frame.
This capability allows the user to have a single document file
that contains many data frames with each data frame containing
a complete drawing sheet. Without the Print Data Frame command
the user would have to: (a) create separate document files for
each drawing sheet or (b) manually reposition all data frames,
other than the active data frame, outside of the sheet limits.
|
|
|
|
|
|
In addition, users have the ability to operate in another mode
of map preparation. The first mode, which was described above,
is when a single data frame contains the entire map to be printed.
The second mode is where one data frame contains the map contents,
while another data frame contains the map border (title block,
sheet border, etc.).
The Print Data Frame command accommodates this scenario by providing
the Include Data Frame matching the Paper Size option.
When this option is checked the Print Data Frame command will
position the active data frame according to the specifications
in the Data Frame Size and Position parameters area and will include
in the plot the data frame whose name is either 11"x17",
24"x36" or Custom, depending upon which Paper Size is
active. This approach enables the user to create a single map
border, placing it in a data frame using one of the following;
11"x17", 24"x36" or Custom
as the name of the data frame, and generate multiple maps without
having to load the map border into multiple data frames.
ArcView 3.x Tools for ArcGIS
ArcGIS users who have worked with ArcView GIS will notice that the commands shown below: (a) do not operate the same in ArcMap as they did in ArcView or (b) are just not a part of core ArcGIS. These commands did not provide GIS functionality but they were an essential part of how ArcView GIS users operated in the ArcView 3.x environment. To ease the transition to ArcGIS, CEDRA's ArcGIS based software includes the CEDRA-ArcView3 Tools toolbar. This toolbar enables ArcGIS users to interact with ArcMap in a manner similar to how ArcView GIS users operated in the ArcView 3.x environment. For users who have never worked with ArcView GIS, these tools provide an easier and more flexible means of interacting with the map.
| CEDRA-ArcView3 Tools toolbar |

|
Functionality offered in the CEDRA-ArcView3 Tools toolbar
- Identify features from the active layers in the Table of Contents.
- Select features from the active layers in the Table of Contents.
- De-select or clear the selected features from the active layers in the Table of Contents.
- Zoom to the extent of all layers in the Table of Contents.
- Zoom to the extent of the active layers in the Table of Contents.
- Zoom to the extent of the selected features in the active layers in the Table of Contents.
- Make all layers in the Table of Contents visible.
- Make all layers in the Table of Contents invisible.
- Delete the selected features in the map with a single click eliminating the need to (a) start the Editor, (b) select the appropriate dataset and (c) select the delete command.
- Delete a group of vertices in a selected polyline or polygon feature by defining a rectangle that encloses the vertices to be deleted.
- Open the attribute table for the selected layer(s) and/or table(s).
- Switch or reverse the selection set for the selected layer(s) and/or table(s).
- Set the current active layer (Target Layer) by picking the desired layer from an alphabetically sorted list of layer names and clicking the OK button.
To download a color brochure, which can be viewed and/or printed with Adobe Acrobat® ReaderTM, click on the following link CEDRA Software Information.
CEDRA-DxfExport is licensed as per the terms of the CEDRA Software License Agreement.