CEDRA-DataEditorTM
Data Maintenance
CEDRA DataEditorTM is an ArcView®
GIS and ArcGIS® extension, that is included with all of the
CEDRA AVseriesTM software or
licensed as a separate extension, which utilizes a customized
dialog box enabling the user to edit and maintain data associated
with features in a shapefile, personal geodatabase or an enterprise
geodatabase. The CEDRA DataEditor extension provides the user
the ability to create a customized dialog box with user-specified
labels and default values, with absolutely no programming,
for any desired layer or layers. As a matter of fact, there is
no limit to the number of layers that can be specified.
The CEDRA-DataEditor software can also be incorporated/embedded
into an existing ArcGIS Server Web application (JavaScript or
VB.NET) as described in the October 2009
issuse of Command of the Month. As such, the CEDRA-DataEditor
software is a Desktop and Server solution for data
entry and maintenance applications.
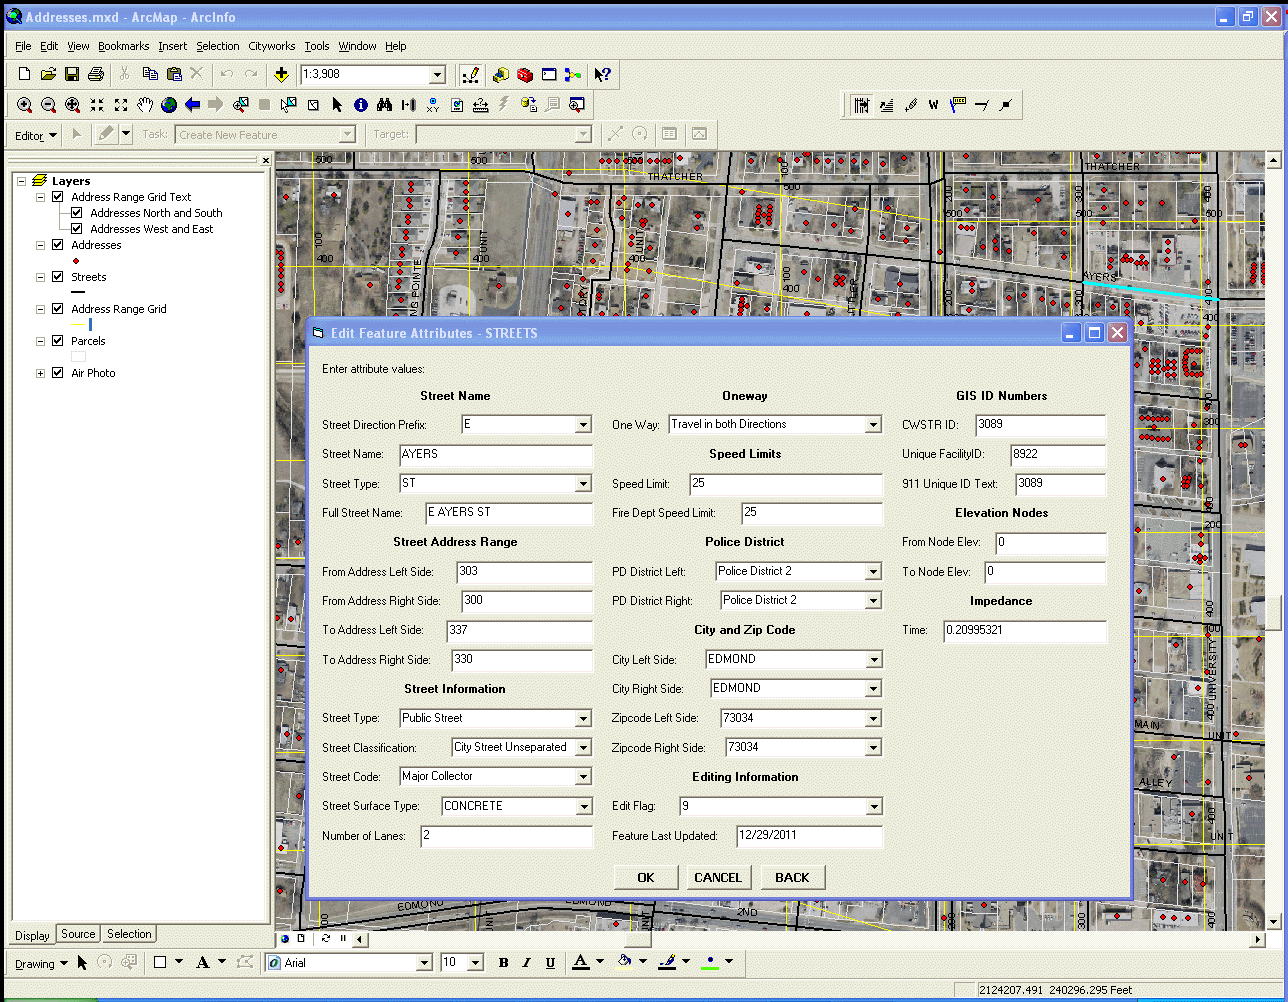
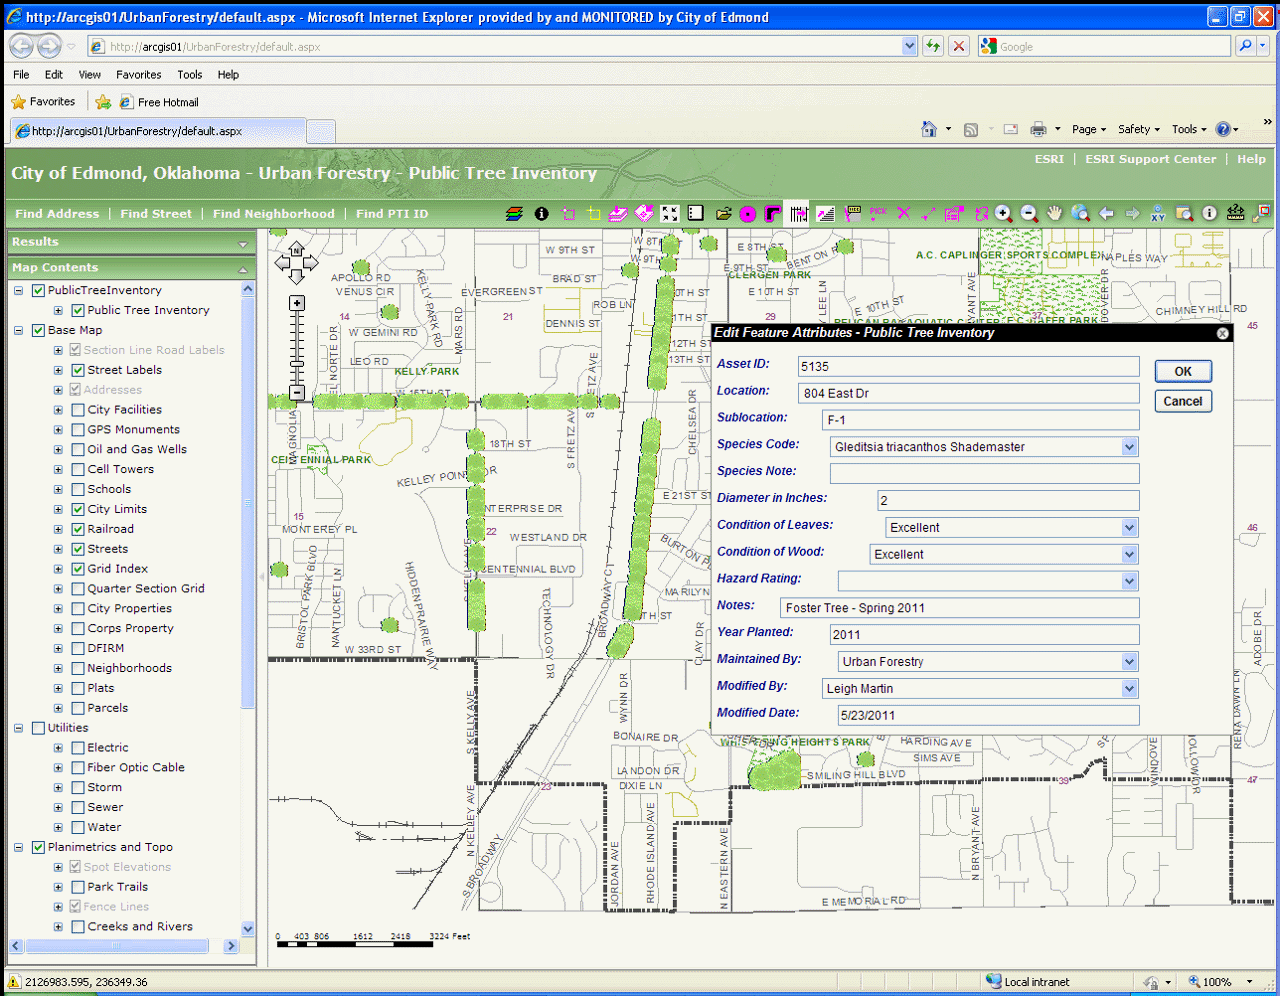
Click here to see an actual Desktop application,
which utilizes the multi-column dialog box design, and here for
an actual Server application that
were developed using the CEDRA-DataEditor software.
The user simply creates, with any word processor or text editor,
an ASCII based file containing the pertinent information for those
attributes in a theme (layer) that can be edited, from which,
the CEDRA DataEditor extension builds a customized dialog box.
This is an ideal tool for those involved with facility maintenance
and/or data capture applications or those who simply wish to enhance
ArcView's or ArcMap's native table editing functionality. With
the CEDRA-DataEditor software there is no need to start and stop
a table editing session. The user simply "points" at
a feature, after which a customized dialog box will appear. The
appropriate data can then be specified, at which point, the OK
button can be selected to update the database.
Using the CEDRA-DataEditor software, the user is able to:
(a) select a value for an attribute from a pull-down list, rather
than having to explicitly type the value,
(b) define pull-down lists which are based upon another attribute's
value,
(c) have built in verification that a numerical value for an attribute
falls within a valid numerical range,
(d) have the value for an attribute computed based upon the evaluation
of an equation which the user defines,
(e) obtain the current calender date in a user-defined format,
(f) generate a unique ID by adding one to the largest value in
a field,
(g) have the coordinates of a point feature displayed as northings
and eastings or latitudes and longitudes,
(h) have the area of a polygon displayed in square feet (square
meters) or acres (hectares),
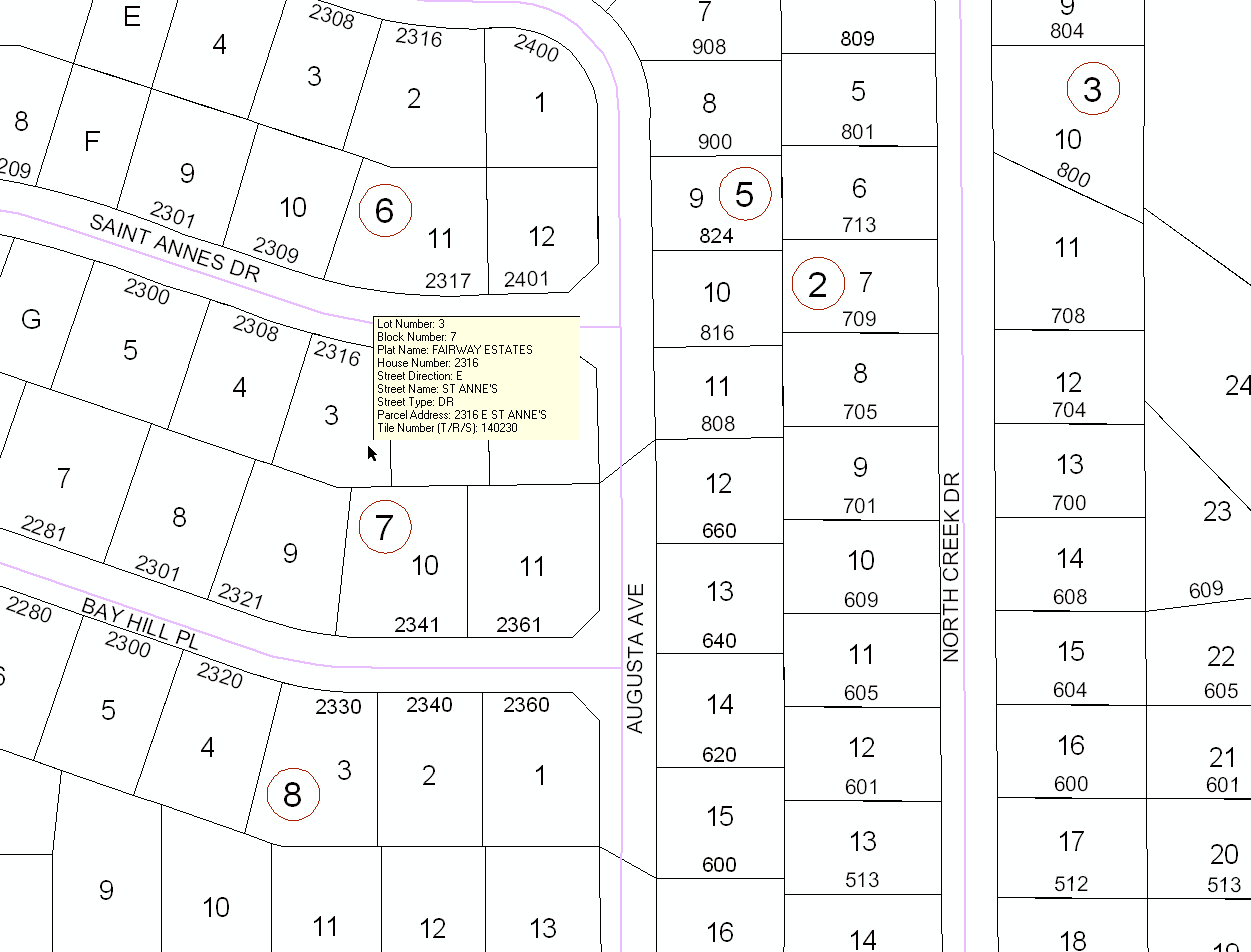
(i) for ArcGIS users, use the Map Tip tool to display a multi-line
map tip, above and to the right of the cursor,
(j) create single or multi-column dialog boxes, with or without
sub-columns,
(k) edit records, which are stored in various tables, that are
associated with a feature, and
(l) display up to 50 attributes in a dialog box with no limit
to the number of dialog boxes that can be displayed.
This type of data maintenance functionality and more is provided
by the CEDRA DataEditor extension and does not require Avenue
or Visual Basic programming. Imagine being able to have customized
dialog boxes without writing a line of code. The February
2005, November 2007, June
2010, June 2011 and November
2011 issues of Command of the Month describe the software's
functionality in greater detail. The August
2009, September 2009, October
2009 and November 2010 issues of
Command of the Month discuss the operation and implementation
of the ArcGIS Server version of the CEDRA-DataEditor software.
For ArcGIS users, included with the CEDRA-DataEditor software
are the CEDRA-DataFrame-Tools and CEDRA-ArcView3-Tools
toolbars. These toolbars enhance the interaction of the user with
ArcMap by (a) facilitating the printing of maps and (b) the processing
of layers and features within the map. Following the CEDRA-DataEditor
software description, below, is a description of these toolbars
and the functionality they provide.
Those interested in a lot more functionality for just a little more expense should check out the CEDRA-AGsuite software package.
Click on this link for a color brochure,
which can be viewed and/or printed with Adobe Acrobat® ReaderTM.
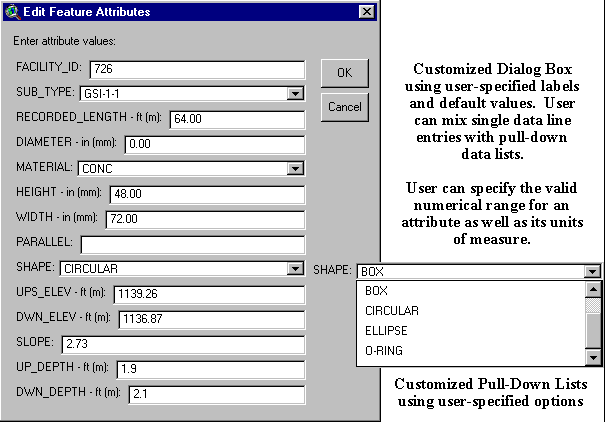
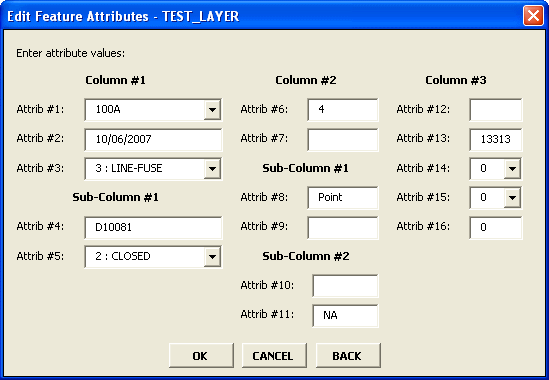
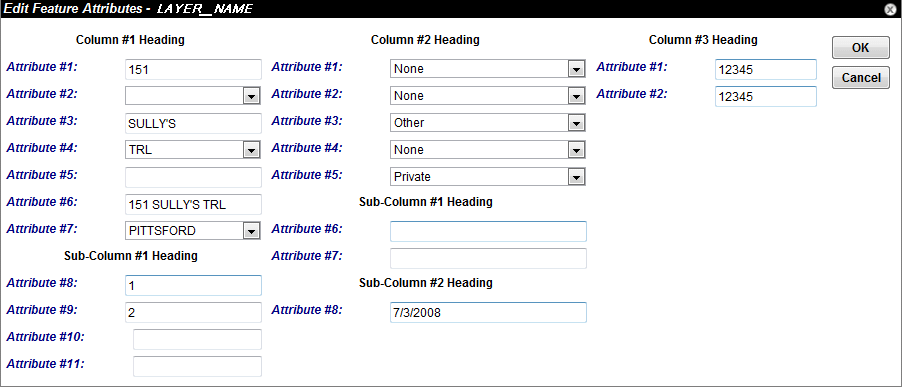
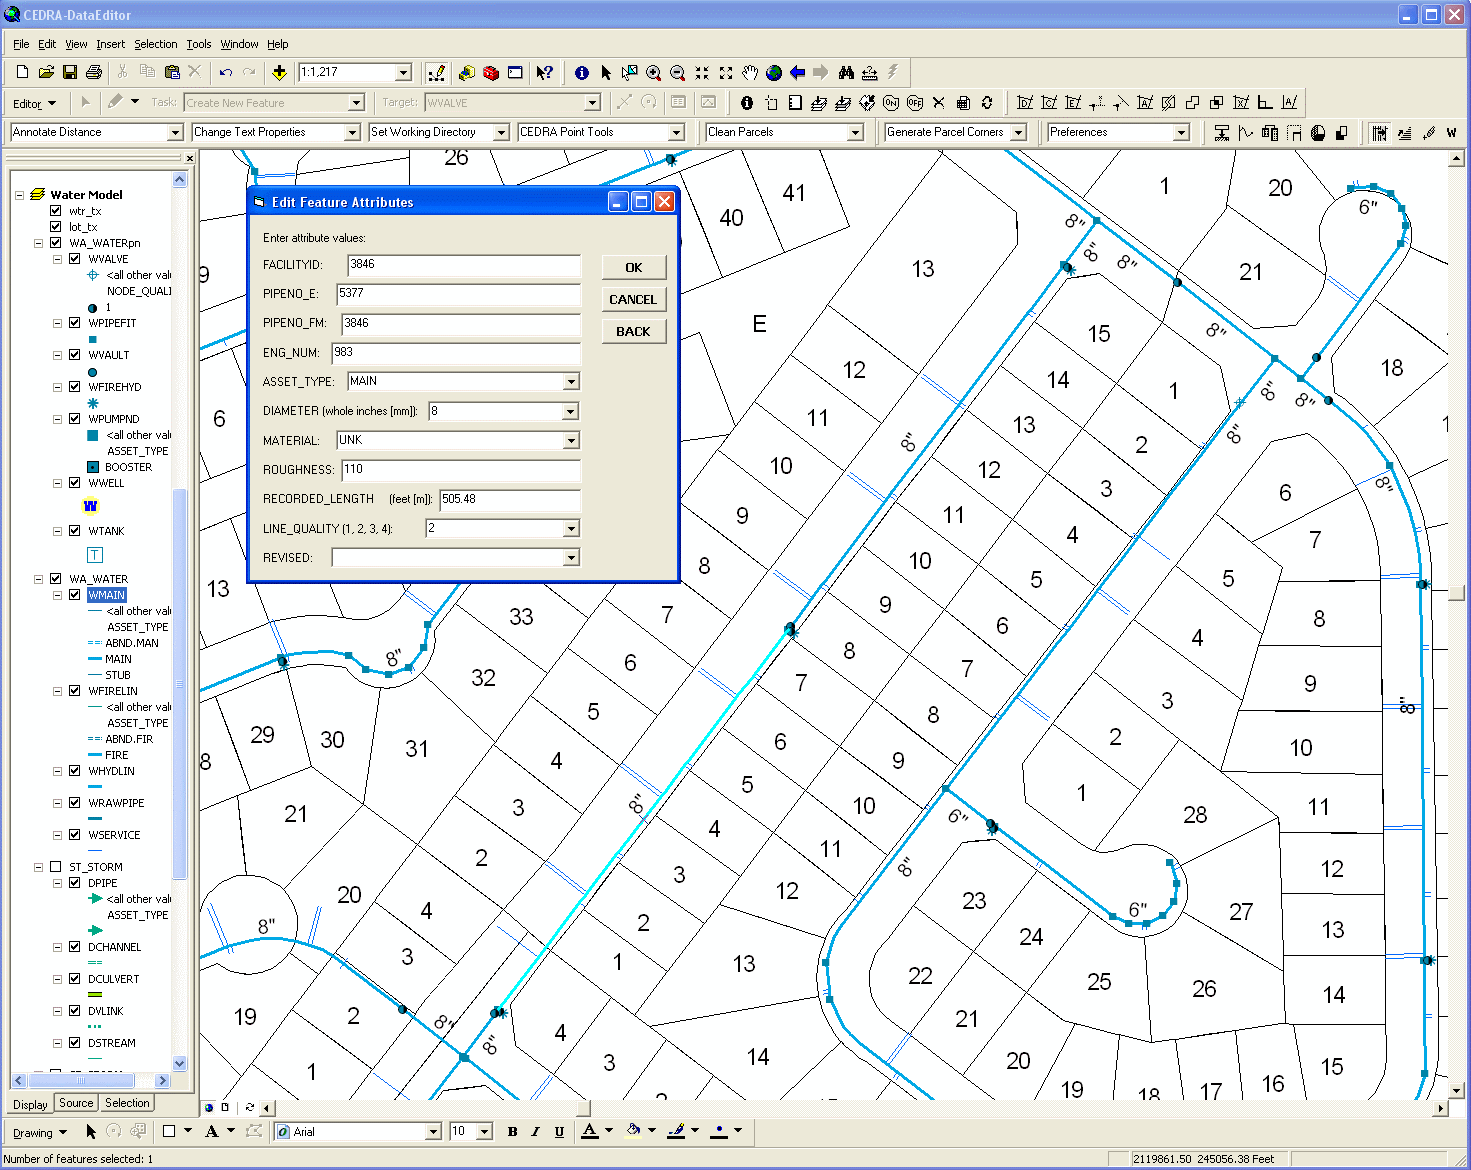
Dialog Boxes created using the CEDRA-DataEditor software
|
|
 |
|
|
 |
|
|
 |
|
|
|
 |
 |
|
|
 |
|
|
 |
CEDRA DataEditorTM
CEDRA DataEditorTM is fully compatible with Versions 3.0, 3.1, 3.2 and 3.3 of ArcView® GIS and Versions 9.3, 10.0, 10.1, 10.2, 10.3, 10.4, 10.5, 10.6 and 10.7 of ArcGIS®.
CEDRA-DataEditorTM is an
ArcView® GIS and ArcGIS extension that is an ideal tool for
data maintenance and capture applications or for those who simply
wish to enhance ArcView's native table editing functionality.
The user is able to create a customized dialog box, for a shapefile,
Personal geodatabase or enterprise SDE geodatabase, which contains
the attributes that can be edited as well as the label describing
the attribute. There is no limit to the number of shapefiles,
Personal geodatabases or enterprise SDE geodatabases that can
be processed or the number of attributes that can be edited. Character
(string), numerical and date data types are supported. In addition,
the user is also able to control the number of attributes that
appear in a customized dialog box.
The CEDRA-DataEditorTM provides
a tool that enables the user to select a feature, afterwhich,
a dialog box similar to the one shown above is displayed. The
user has the option of creating a single column or multi-column
dialog box. The information displayed in the dialog box is based
upon the data in the Theme Attribute Data file. This file
contains a list of all of the themes and their attributes that
the user can edit. The order in which the attributes are listed
in the Theme Attribute Data file will dictate how they
appear in the dialog box.
The Theme Attribute Data file is a sequential ASCII based
file that contains a list of all of the themes and their attributes,
which the user can edit with the Edit Feature Attributes tool.
The CEDRA-DataEditor extension supports two types of database
designs for a theme.
The first is one where all of the attributes are stored in the theme, while,
The second is one where some attributes are stored in the theme and some are stored in associated tables. Under this design, there are two attributes in the theme which link to the appropriate associated table. The first attribute contains a unique identifier (ID) that links a record in the theme with a record in the associated table, while the second, contains an attribute whose value points to the associated table. There is no limit to the number of associated tables that a theme can have.
Note that it is possible for the Theme Attribute Data file to contain a mixture of these database designs. That is, the Theme Attribute Data file does not have to contain themes of a single database design type, but rather, can contain both types, if need be. The user also has the ability to display a mixture of single and multi-column dialog boxes. That is, some layers can be displayed using a single column dialog box, while others can be displayed using a multi-column dialog box.
In addition, the user is able to: (a) explicitly specify the default value for specific attibutes, (b) have the default value computed as the feature's area, perimeter, length or coordinate, (c) have the default value be the current date or (d) have the value computed by evaluating an equation. The area can be in terms of square feet or square meters, or in terms of acres or hectares, while the current date can be formatted to user specifications. Coordinate values for a point feature can be in terms of projected coordinates or latitudes and longitudes. The equation can contain the standard arithmetic operators, Boolean operators, and trigonometric and other functions.
The user also has the ability to specify a numerical range indicating the allowable values for an attribute, as well as the ability to specify a conditional (IF statement) in the attribute equation. The syntax for specifying equations in the CEDRA-DataEditor is similar to that offered in the Microsoft Excel software. In essence the CEDRA-DataEditor is like a "mini" spreadsheet program.
Sample Theme Attribute Data File
A portion of a sample Theme Attribute Data file is shown below. Note that the /* characters denote a comment line, which the user can insert freely within the Theme Attribute Data file. Comment lines can be used to improve the readability of the file, as well as, explain the rationale in how attributes are edited.
/*
/* Identify the Theme to be defined
/*
THEME
WW_SEWERSpn.shp
/*
/* Identify the attributes for editing
/*
/* Attribute 1 : numeric data line item
WW_NODE_KEY
WW_NODE_KEY:
DEFAULT ADDONE
/*
/* Attribute 2 : string data line item
ENG_NUM
ENG_NUM (max 5 chars.):
REMEMBER_LAST
/*
/* Attribute 3 : string combo box item with seven possible choices
WW_NODE_TYPE
WW_NODE_TYPE (DROP, MH, LS, ...):
CHOICES
AVLV
BEND
CO
CROS
DROP
MH
LS
END
DEFAULT MH
REMEMBER_LAST
/*
/* Attribute 4 : numeric data line item
WIDTH 2
WIDTH - in (mm):
DEFAULT 0.0
/*
/* Attribute 5 : value computed from an equation
SLOPE
Pipe Slope (%):
ATTRIBUTE_EQUATION
((EZ-SZ)/LEN)*100.0
/*
/* End of Theme definition
END
/*
/* Continue with other themes
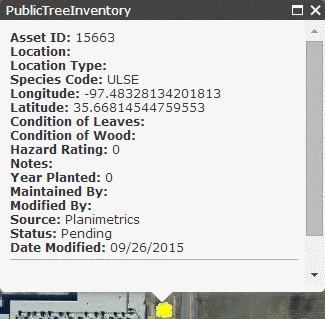
For ArcGIS users, the CEDRA-DataEditor Map Tip tool enables
the user to display multi-line map tips for those layers which
appear in the Theme Attribute Data File. By simply moving the
cursor over a desired feature, the Map Tip tool will display in
the form of a map tip, the values for the attributes that are
defined in the Theme Attribute Data File. In so doing, the user
is able to quickly display attribute values without having to
pick or select a feature. In addition to the attribute value,
the map tip will contain the user-defined label, as it appears
in the Theme Attribute Data File, to facilitate the identification
of the attribute value. For example, rather than seeing the number
8, the map tip would contain the string Pipe Size: 8.
Additionally, ArcGIS users are able to create multi-column dialog
boxes, with or without sub-columns within a specific column. The
user is able to control which layer(s) are to be displayed using
a multi-column dialog box, as well as, specifying different multi-column
dialog box definitions for various layers. As such, the user is
able to display a mix of single and multi-column dialog boxes
with each dialog box tailored for specific layers.
Presented below is a list of the supported arithmetic operators,
Boolean operators, and trigonometric and other functions which
may appear in an attribute equation:
Supported Mathematical Operators
- ^ Exponentiation.
- / Division.
- * Multiplication.
- + Addition.
- - Subtraction.
Supported Boolean Operators
- = Equality.
- < Less than.
- > Greater than.
- <= Less than or equal to.
- >= Greater than or equal to.
- <> Not equal to.
Supported Functions
- ABS = absolute value of a number.
- ACOS = arc cosine of a number expressed in radians.
- ASIN = arc sine of a number expressed in radians.
- ATAN = arc tangent of a number expressed in radians.
- CHR = returns a string containing the character associated
with the specified ASCII numeric character code.
- COS = cosine of a number expressed in decimal degrees.
- DEG2RAD = conversion of degrees to radians.
- LEFTPADxx = returns string of xx characters with leading
zeros inserted to pad the string.
- LEN = returns the number of characters in a string.
- RAD2DEG = conversion of radians to degrees.
- RIGHTPADxx = returns string of xx characters with trailing
zeros inserted to pad the string.
- ROUND = rounding up of a number to the nearest whole number.
- SIN = sine of a number expressed in decimal degrees.
- SQRT = square root of a number greater than zero.
- TAN = tangent of a number expressed in decimal degrees.
- TRUNCATE = truncation of a number.
- STRING = treat the value as a string, not as a numeric value.
- TRIM = remove leading and trailing blanks from the value.
- TRIML1 = remove the first character in a string.
- TRIML2 = remove the first two characters in a string.
- TRIML3 = remove the first three characters in a string.
- TRIML4 = remove the first four characters in a string.
- TRIML5 = remove the first five characters in a string.
- TRIML6 = remove the first six characters in a string.
- TRIMR1 = remove the last character in a string.
- TRIMR2 = remove the last two characters in a string.
- TRIMR3 = remove the last three characters in a string.
- TRIMR4 = remove the last four characters in a string.
- TRIMR5 = remove the last five characters in a string.
- TRIMR6 = remove the last six characters in a string.
Sample Attribute Equations
In the samples shown below, note that J2, K2, P2, R2, Q2, M2, L2, S2, N2, PIN1, PIN2, PIN3, MAP, SLN, BLDNUM, HOUSENUM, ST_DIR, STREET, LAYER and FID represent sample attributes (fields).
- J2-K2
- 29.8*P2*R2*Q2^2*SQRT(M2)
- ((J2-20)/L2)^0.54*N2
- S2*N2
- IF(Q2=2.5,0.9,IF(Q2=4.5,0.78,IF(Q2=1.9,0.97,IF(Q2=2.5,(Q2^-0.092*1.0808),4.0))))
- DEG2RAD(ACOS(0.5))
- ASIN(0.75)
- ATAN(0.35)
- SIN(30)
- COS(60)
- TAN(45)
- ROUND(4.75)
- TRUNCATE(4.75)
- STRING(PIN1)+STRING(PIN2)
- STRING(PIN1)+”-“+STRING(PIN2)+”-“+STRING(PIN3)
- “My String = “+STRING(PIN1)+”000-“+STRING(PIN2)+”0010”
- IF(MAP=SLN,"TRUE_CONDITION","FALSE_CONDITION")
- IF(BLDNUM<>" ",(TRIM(HOUSENUM)+TRIM(ST_DIR)+TRIM(STREET)),BLDNUM)
- TRIM(HOUSENUM)+TRIM(ST_DIR)+TRIM(STREET)
- IF(CAPACITY="NA","-9",IF(CAPACITY="EMPTY","-6",TRIMR1(CAPACITY)))
- IF(KVAR_RATIN="NA","-9",IF(KVAR_RATIN="400",450,KVAR_RATIN))
- TRIML2((TRIMR1(LAYER)))
- “PGIS” + LEFTPAD06(FID)
- IF(LST = 1, (“PGIS” + LEFTPAD06(FID)), (“PGIS”
+ RIGHTPAD06(FID)))
Theme Attribute Data File Commands
- NLINES.
- FIXEDWIDTH.
- THEME.
- SECONDS.
- RANGE.
- CHOICES.
- CHOICES_WHEN.
- DEFAULT.
- REMEBER_LAST.
- ATTRIBUTE_EQUATION.
- NCOLUMNS.
- COLUMNITEMS.
- COLUMNWIDTH.
- COLUMNHEADING.
- SUBCOLUMNS.
- SUBCOLUMNSTART.
- SUBCOLUMNHEADING.
- DISPLAYWITHCOLUMNS.
Supported DEFAULT Command Keywords
Below is a list of the supported keywords which can be used to establish a default value for an attribute. That is, rather than explicitly specifying the default value, the user is able to specify a keyword which will generate a value based upon the keyword that was entered. The syntax for using these keywords is to precede the keyword with the command DEFAULT followed by at least one space to separate the command, DEFAULT, from the keyword. Using these keywords will result in the default value for an attribute being the:
- ADDONE : largest current attribute value for the layer plus
one (1).
- CURRENT_DATE : current calender date in a user-specified
format.
- RETURN_LENGTH : length or perimeter.
- RETURN_AREA : area.
- RETURN_AREA_UNITS : area in square feet or meters.
- RETURN_X : X coordinate of a point feature in projected coordinates.
- RETURN_Y : Y coordinate of a point feature in projected coordinates.
- RETURN_X_DD : X coordinate of a point feature in decimal
degrees.
- RETURN_Y_DD : Y coordinate of a point feature in decimal
degrees.
- RETURN_X_DMS : X coordinate of a point feature in degrees,
minutes and seconds.
- RETURN_Y_DMS : Y coordinate of a point feature in degrees,
minutes and seconds.
- RETURN_X_LONG : X coordinate of a point feature in degrees,
minutes and seconds with direction (E or W).
- RETURN_Y_LAT : Y coordiante of a point feature in degrees,
minutes and seconds with direction (N or S).
- RETURN_XS : X coordinate of a feature's start point in projected
coordinates.
- RETURN_YS : Y coordinate of a feature's start point in projected
coordinates.
- RETURN_XS_DD : X coordinate of a feature's start point in
decimal degrees.
- RETURN_YS_DD : Y coordinate of a feature's start point in
decimal degrees.
- RETURN_XS_DMS : X coordinate of a feature's start point in
projected coordinates.
- RETURN_YS_DMS : Y coordinate of a feature's start point in
projected coordinates.
- RETURN_XS_LONG : X coordinate of a feature's start point
in degrees, minutes and seconds with direction (E or W).
- RETURN_YS_LAT : Y coordinate of a feature's start point in
degrees, minutes and seconds with direction (N or S).
- RETURN_XM : X coordinate of a feature's mid point in projected
coordinates.
- RETURN_YM : Y coordinate of a feature's mid point in projected
coordinates.
- RETURN_XM_DD : X coordinate of a feature's mid point in decimal
degrees.
- RETURN_YM_DD : Y coordinate of a feature's mid point in decimal
degrees.
- RETURN_XM_DMS : X coordinate of a feature's mid point in
degrees, minutes and seconds.
- RETURN_YM_DMS : Y coordinate of a feature's mid point in
degrees, minutes and seconds.
- RETURN_XM_LONG : X coordinate of a feature's mid point in
degrees, minutes and seconds with direction (E or W).
- RETURN_YM_LAT : Y coordinate of a feature's mid point in
degrees, minutes and seconds with direction (N or S).
- RETURN_XE : X coordinate of a feature's end point in projected
coordinates.
- RETURN_YE : Y coordinate of a feature's end point in projected
coordinates.
- RETURN_XE_DD : X coordinate of a feature's end point in decimal
degrees.
- RETURN_YE_DD : Y coordinate of a feature's end point in decimal
degrees.
- RETURN_XE_DMS : X coordinate of a feature's end point in
degrees, minutes and seconds.
- RETURN_YE_DMS : Y coordinate of a feature's end point in
degrees, minutes and seconds.
- RETURN_XE_LONG : X coordinate of a feature's end point in
degrees, minutes and seconds with direction (E or W).
- RETURN_YE_LAT : Y coordinate of a feature's end point in
degrees, minutes and seconds with direction (N or S).
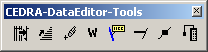
CEDRA-DataEditor Toolbar for ArcGIS
Shown below is the CEDRA-DataEditor toolbar for ArcGIS users.
| CEDRA-DataEditor toolbar |
|
Functionality offered in the CEDRA-DataEditor Toolbar
- Display and Edit user-specified attributes associated with a feature.
- Reload the Theme Attribute Data File.
- Delete a Feature and its associated table records.
- Set the current working directory.
- Display user-specified attributes in the form of a multi-line map tip.
- Break and Add a Line whose start point is the break point. Additionally, transfer user-specified attributes of the feature being broken to the new line feature that is created.
- Break and Add a Point whose coordinates are those of the break point. Additionally, transfer user-specified attributes of the feature being broken to the new point feature that is created.
- Edit one or more records which are stored in a table that are associated with a feature. If multiple tables are associated with a feature, the user selects the table to be processed.
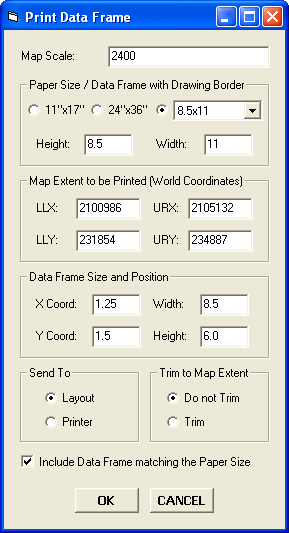
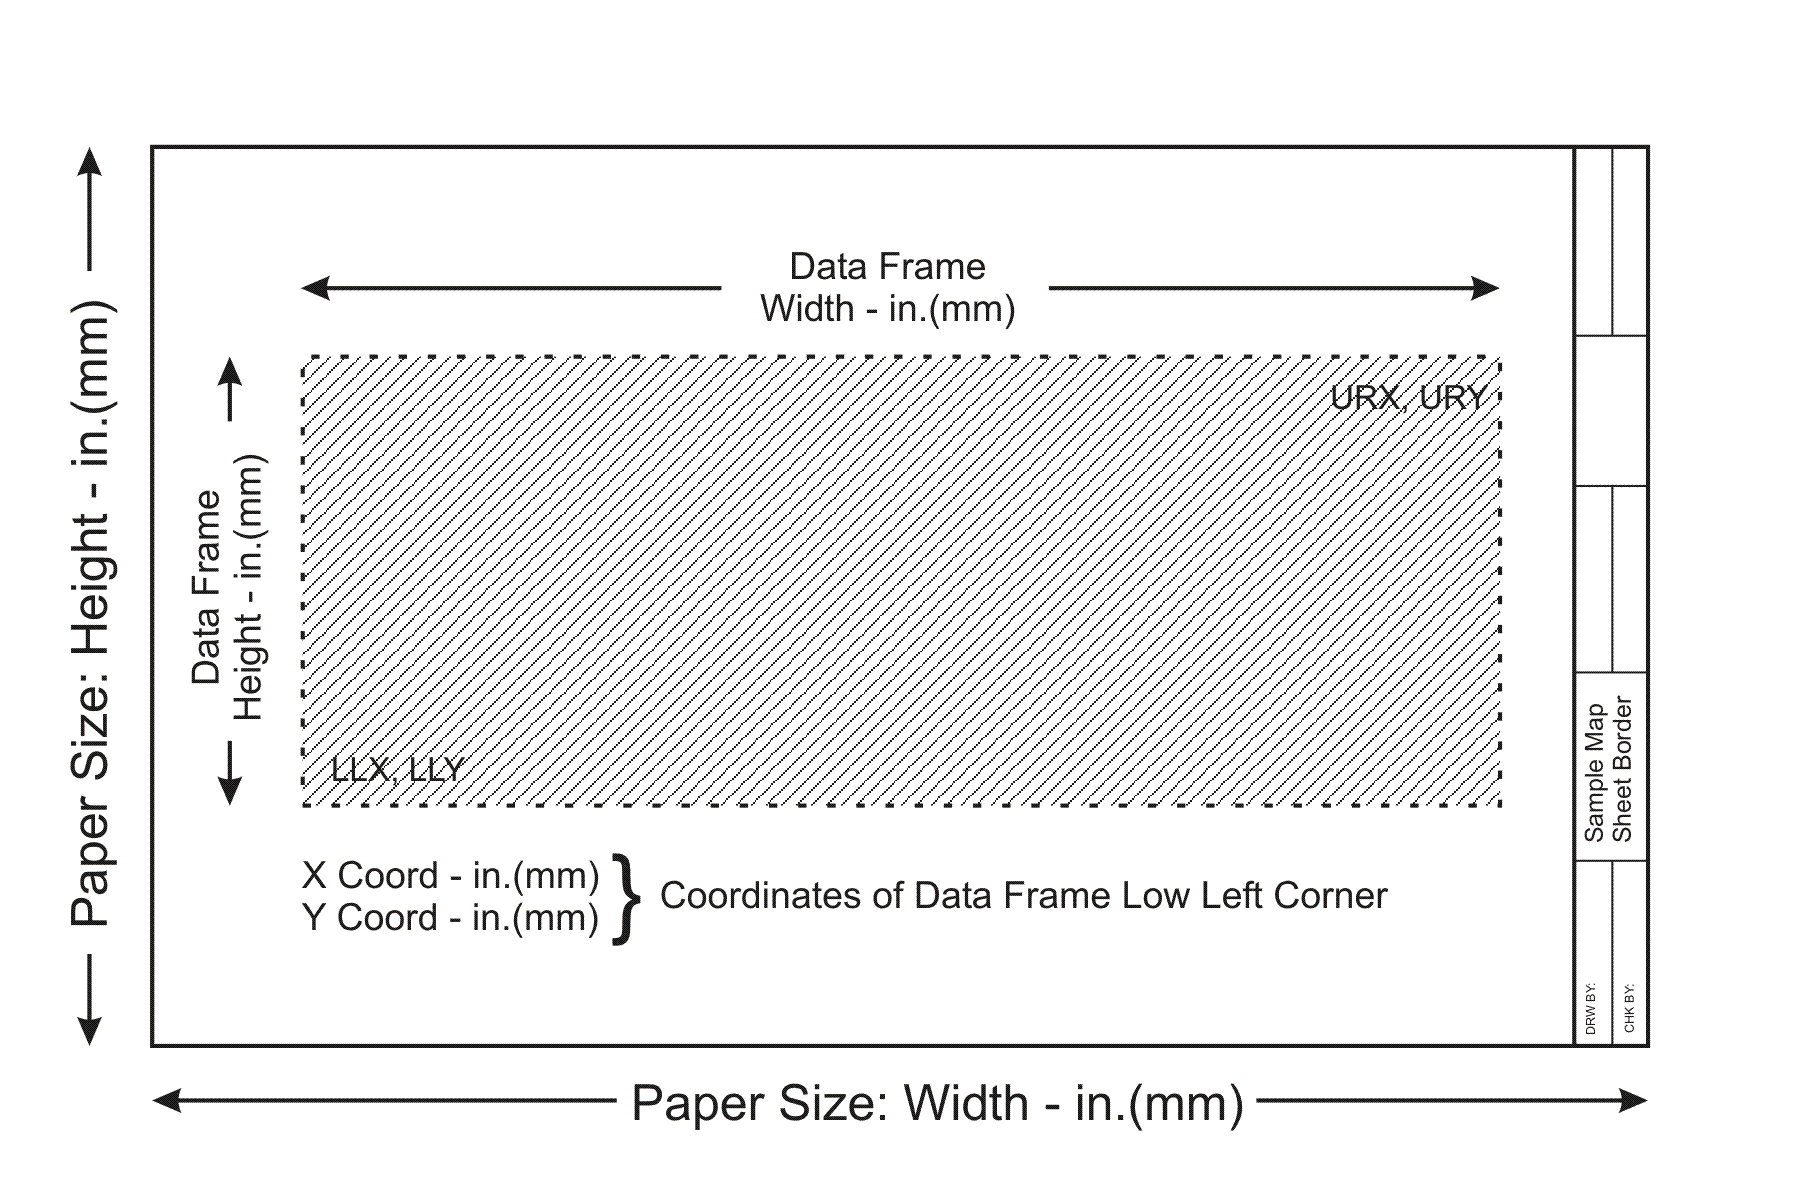
Printing Capability for ArcGIS
ArcGIS® users have the ability to print the active data
frame using the Print Data Frame command, which is available in
the CEDRA-DataFrame-Tools toolbar. The Print Data Frame command
differs from conventional ArcGIS printing in that the user is
able to control: (a) the map scale, (b) the map area to be printed,
(c) the location of the map on the paper and (d) optionally, whether
a data frame, which contains a map sheet border, should be included
or not in the map.
As most ArcMap users have realized, within an ArcMap document
file (.mxd) all data frames share the same layout. This causes
the difficulty of when the layout view is activated all of the
data frames in the document file appear in the layout, which for
some applications is not what the user wants. The Print Data Frame
command will print the active data frame, from data or layout
view, ensuring that: (a) the desired map scale is preserved, and
(b) all other data frames do not appear on the plot. This is achieved
by programmatically positioning all data frames, other than the
active data frame, in the document file outside of the user specified
sheet limits (Paper Size parameters). In so doing, when the layout
view is activated the only data frame that appears in the layout
view is the active data frame.
This capability allows the user to have a single document file
that contains many data frames with each data frame containing
a complete drawing sheet. Without the Print Data Frame command
the user would have to: (a) create separate document files for
each drawing sheet or (b) manually reposition all data frames,
other than the active data frame, outside of the sheet limits.
|
|
|
|
|
|
In addition, users have the ability to operate in another mode
of map preparation. The first mode, which was described above,
is when a single data frame contains the entire map to be printed.
The second mode is where one data frame contains the map contents,
while another data frame contains the map border (title block,
sheet border, etc.).
The Print Data Frame command accommodates this scenario by providing
the Include Data Frame matching the Paper Size option.
When this option is checked the Print Data Frame command will
position the active data frame according to the specifications
in the Data Frame Size and Position parameters area and will include
in the plot the data frame whose name is either 11"x17",
24"x36" or Custom, depending upon which Paper Size is
active. This approach enables the user to create a single map
border, placing it in a data frame using one of the following;
11"x17", 24"x36" or Custom
as the name of the data frame, and generate multiple maps without
having to load the map border into multiple data frames.
ArcView 3.x Tools for ArcGIS
ArcGIS users who have worked with ArcView GIS will notice that the commands shown below: (a) do not operate the same in ArcMap as they did in ArcView or (b) are just not a part of core ArcGIS. These commands did not provide GIS functionality but they were an essential part of how ArcView GIS users operated in the ArcView 3.x environment. To ease the transition to ArcGIS, CEDRA's ArcGIS based software includes the CEDRA-ArcView3 Tools toolbar. This toolbar enables ArcGIS users to interact with ArcMap in a manner similar to how ArcView GIS users operated in the ArcView 3.x environment. For users who have never worked with ArcView GIS, these tools provide an easier and more flexible means of interacting with the map.
| CEDRA-ArcView3 Tools toolbar |

|
Functionality offered in the CEDRA-ArcView3 Tools toolbar
- Identify features from the active layers in the Table of Contents.
- Select features from the active layers in the Table of Contents.
- De-select or clear the selected features from the active layers in the Table of Contents.
- Zoom to the extent of all layers in the Table of Contents.
- Zoom to the extent of the active layers in the Table of Contents.
- Zoom to the extent of the selected features in the active layers in the Table of Contents.
- Make all layers in the Table of Contents visible.
- Make all layers in the Table of Contents invisible.
- Delete the selected features in the map with a single click eliminating the need to (a) start the Editor, (b) select the appropriate dataset and (c) select the delete command.
- Delete a group of vertices in a selected polyline or polygon feature by defining a rectangle that encloses the vertices to be deleted.
- Open the attribute table for the selected layer(s) and/or table(s).
- Switch or reverse the selection set for the selected layer(s) and/or table(s).
- Set the current active layer (Target Layer) by picking the desired layer from an alphabetically sorted list of layer names and clicking the OK button.
To download a color brochure, which can be viewed and/or printed with Adobe Acrobat® ReaderTM, click on the following link CEDRA Software Information.
CEDRA-DataEditor is licensed as per the terms of the CEDRA Software License Agreement.