CEDRA-AVcadTM
CAD tools for ArcGIS
An ArcView® GIS and ArcGIS® extension for creating, editing
and maintaining shapefiles, personal geodatabases and enterprise
SDE geodatabases. CEDRA AVcadTM
offers additional menus, buttons and tools, providing Computer
Aided Drafting functionality in an ArcView® GIS or ArcGIS
environment. Serving as the CAD engine for the CEDRA AVseriesTM software, AVcadTM
offers more than 100 commands for creating, editing and manipulating
point, line, polyline, polygon, curve and text elements, as well
as, point snapping across themes. As a matter of fact, because
of the robustness of AVcad's geometry and polygon editing commands,
AVcad can be thought of as a COGO or Parcel Mapping "lite"
package.
For a complete listing and brief description of all of the
menu items and tools offered in CEDRA AVcad click here.
In addition to the shapefile editing tools, CEDRA AVcadTM provides functionality for editing
attribute data using customized dialog boxes. The CEDRA-DataEditorTM extension, which is included with CEDRA
AVcad, enables the user to identify the specific themes and attributes
which the user can edit. Quality control and data verification
tools are included with the CEDRA-DataEditor extension to ensure
that the database is properly maintained. The customized dialog
boxes, which the user defines, are established without having
the user write any Avenue, Visual Basic or other programming language
software. With a simple point and click, CEDRA DataEditor users
are able to edit and maintain their tabular information without
starting and stopping table editing sessions.
CEDRA AVcad supports the editing (reading and writing) of shapefiles, Personal geodatabases (PGD), File geodatabases (GDB) and enterprise SDE geodatabases.
Check out CEDRA AVcad if you would like to increase your accuracy and productivity, when using ArcView GIS or ArcGIS, by having CAD editting tools that enable you to globally annotate features, create and edit geometrically points, lines, curves and polygons, snap between themes, transform features from one coordinate system into another, transcribe deed data, manipulate ArcInfo® coverages and ArcView themes, pass data easily into SDE databases and a whole lot more.
ArcGIS users should check out the CEDRA-ArcView3-Tools toolbar. This toolbar offers a number of selection tools which will increase productivity by at least 30%. This is accomplished by reducing the number of clicks that are made in performing typical selection operations. ArcGIS users who have previously worked with ArcView GIS will definitely appreciate these tools.
To download an order form for a demo version of CEDRA-AVcad with Tutorial Manual click on the link. Once the order form has been downloaded, fill-in the requested information at the bottom of the form and then fax, e-mail or mail the order form back to The CEDRA Corporation. To see what's included in the demo version of the software click here CEDRA Demo Pack Information.
Those interested in a lot more functionality for just a little
more expense should check out the CEDRA-AGsuite
software package.
Click on this link for a color brochure,
which can be viewed and/or printed with Adobe Acrobat® ReaderTM.
|
|
 |
CEDRA AVcadTM
CEDRA AVcadTM is fully compatible with Versions 3.0, 3.1, 3.2 and 3.3 of ArcView® GIS and Versions 9.3, 10.0, 10.1, 10.2, 10.3, 10.4, 10.5, 10.6 and 10.7 of ArcGIS®.
CEDRA AVcadTM provides the following functionality:
Building the database from within CEDRA AVcadTM
- Geometric creation of point, line, polyline, polygon, curve and text elements in an interactive graphic environment.
- Support of a variety of coordinate systems such as State Plane, UTM, latitudes-longitudes, etc.
- Ability to specify measures in feet, meters, varas, chains, rods, etc.
- Ability to enter directions in terms of an Azimuth, Bearing or Cartesian angle.
- Ability to create, edit and maintain attribute data with the CEDRA-DataEditorTM extension.
Geometric functionality
- More than 80 tools creating and editing point, line, curve, polygon and annotation features.
- Point Creation
- Arbitrary picking within the view window.
- Picking at the endpoint of a line or curve with point snapping.
- Via keyboard entry of coordinates.
- From a base point proceeding in a direction a specified distance.
- Turning an angle off a baseline defined by picking 2 points.
- Turning an angle off a baseline defined by picking at a line.
- Along a line or curve a specified distance or arc length and offset.
- Along a line or curve specifying station and offset values.
- Point projection on lines or curves.
- Division of a line or curve into equal parts creating point features.
- Specifying an elevation that is used to interpolate a point's location between the elevations associated with two picked points.
- Location of the center of a curve.
- At the endpoints of line features, without duplicate points, at shared line endpoints.
- At the vertex locations that comprise a line feature.
- Using numerical text elements in a CAD drawing with the CEDRA-XsectionsTM extension points can be created from cross-section drawings.
- Using numerical text elements in a CAD drawing points can
be created at the:
- start point of the text,
- end point of the text,
- mid point of the text,
- location of the decimal point within the text and with an attribute of the text
- being stored as the point's Z or elevation attribute.
- From a set of selected polygons create points representing the polygon's centroid with the [Generate Parcel Centroids] command.
- From a point, line or polygon feature using the centroid of the feature as the coordinates of the point and the text that is associated with a selected group of annotation features stored as an attribute with the point.
- From a point, line or polygon line feature using the centroid of the feature as the coordiantes of the point and the text that is associated with the annotation features that are within a user-specified distance of the coordinates stored as an attribute with the point.
- At the centroid of a polygon. If the centroid falls outside the polygon, the point will be repositioned to fall within the polygon.
- From footage calls (1000 FNL, 1750 FEL, etc.) with the option of creating line features connecting the point with the appropriate edge of a polyline/polygon feature, ideal for well spotting applications.
- From footage calls (1000 FNL, 1750 FEL, etc.) stored in a table, ideal for well spotting applications.
- At the vertices of polyline/polygon features with the ability to transfer attributes from the polyline/polygon to the points. Vertex coordinates and optionally, the polyline/polygon layer and OID, are stored as attributes with the point.
- From data stored in a table, that data comprised of:
- a From Point ID,
- a To Point ID,
- a Distance from the From Point ID to the point to be created,
- Any other attributes that may wish to be transferred to the point to be created.
- Line Creation
- Two-point and polyline with point snapping for polyline vertices.
- From a base point proceeding in a direction a specified distance.
- Turning an angle off a baseline defined by picking 2 points.
- Turning an angle off a baseline defined by picking at a line.
- Ticks of a user-specified length and spacing along a line or curve.
- Horizontal line and vertical line.
- Tangent to a curve.
- Two-point lines from the edges or line segments that comprise a polyline.
- Two-point lines from the edges or line segments that comprise a polygon.
- Two-point lines from an ASCII file containing connectivities that are based upon node numbers.
- Polylines from an ASCII file containing coordinates of the vertices comprising the polyline.
- Two-point lines by connecting point features based upon a sequential attribute value such as an OID.
- Two-point lines by connecting point features based upon a sequential attribute and a common attribute value such as a point code value.
- Polyline from a string of features.
- Polyline representing a part of a multi-part polygon.
- Polygon Creation
- Picking polygon vertices with or without point snapping.
- Auto-search or trace connected lines and/or curves to define
a string from which:
- a polygon is created using the boundary of the string.
- a polygon buffering the string is created by specifying a left and right offset.
- Sector polygons that emanate from a base point with the CEDRA-SectorPolygonsTM
extension by specifying:
- the number of rings, up to 10, defining the number of concentric circles.
- the number of sectors, which are like slices in a pie.
- Transcribing deed data with the
ability to adjust non-closed parcels by the:
- least squares method.
- compass rule.
- crandall method.
- transit rule.
- Subdividing a quadrilateral, defined by a polyline or a polygon, by specifying the number of rows and columns thereby creating a grid with the CEDRA-GridAQuadrilateralTM extension.
- Buffers by picking:
- a point and specifying the number of buffer rings and a diameter thereby creating circular polygons.
- a point and specifying the number of buffer rings and a width thereby creating square polygons.
- a point and specifying the number of buffer rings, width, height and angle of inclination thereby creating rectangular polygons.
- a string and specifying a left and right offset.
- a polygon and specifying a left and right offset.
- Buffers by peforming a union on any number of:
- two-point lines and/or polylines and specifying a left and right offset.
- polygons and specifying a left and right offset with the
option to:
- keep the original polygons which were unioned, or
- delete the original polygons which were unioned.
- Curve Creation
- Preserve radius as an attribute.
- Handle circular arcs whose central angle exceeds 180 degrees.
- Circle given center and point on circumference.
- Circle or arc through 3 points.
- Arc given center, start point, and arc length.
- Arc given center, start point, and endpoint.
- Arc given center, start point, and central angle.
- Arc tangent to two lines of known radius.
- Arc tangent to two lines passing through a point.
- Arc given radius and passing through 2 points.
- Circle given radius and passing through 2 points.
- Tangent Arc given its PC, radius and arc length.
- Tangent Arc given its PC, radius and central angle.
- Tangent Arc given its PC, radius and chord length.
- Tangent Arc using the end point of a line or curve feature and another point which acts as the tangent arc's end point.
- Non-Tangent Arc given its PC, radius, chord direction and chord length.
- Non-Tangent Arc given its PC, radius, chord direction and arc length.
- Non-Tangent Arc given its PC, radius, chord direction and central angle.
- Text or Annotation Creation
- Mass annotation of:
- distances for line features, as well as, distances for the sides comprising polygon features.
- azimuths for line features, as well as, azimuths for the sides comprising polygon features.
- bearings for line features, as well as, bearings for the sides comprising polygon features.
- azimuths and distances for line features, as well as, azimuths and distances for the sides comprising polygon features.
- bearings and distances for line features, as well as, bearings and distances for the sides comprising polygon features.
- radii for curve features, as well as, radii for the sides comprising polygon features.
- arc lengths for curve features, as well as, arc lengths for the sides comprising polygon features.
- radii and arc lengths for curve features, as well as, radii and arc lengths for the sides comprising polygon features.
- geometric area for polygon features.
- selected point feature's point number, elevation, point code,
point description and coordinates in:
- map units,
- distance units,
- decimal degrees and/or
- latitude and longitude.
- point data (coordinates, elevation, etc.) for point features offset from the point or in table format.
- any attribute data for point, line and polygon features.
- an attribute or multiple attributes for point, line and polygon features with the [Text or Attribute] command.
- Convert annotation in a CAD drawing (.dxf, .dwg, .dgn, ...) into text that can be edited.
- Convert a straight or inclined annotation feature into a
curved annotation feature, which follows the path of an existing
polyline feature, with the ability to:
- control the plus distance along the existing polyline feature.
- control the offset distance from the existing polyline feature.
- change the text which is associated with the annotation feature.
- flip or reverse the annotation feature.
- Create annotation denoting a line's Distance, Bearing and/or Azimuth given two picks (an implied baseline).
- Create annotation denoting a curve's Radius and/or Arc Length given two picks and a radius defined explicitly or by a pick.
- Mass annotation of:
- Offset Elements
- Line(s)parallel to a line.
- Curve(s)concentric to a curve.
- Line and curve elements offset to:
- a string of lines/curves picked by the user.
- a string defined by auto-searching or tracing connected lines/curves.
- a polygon picked by the user.
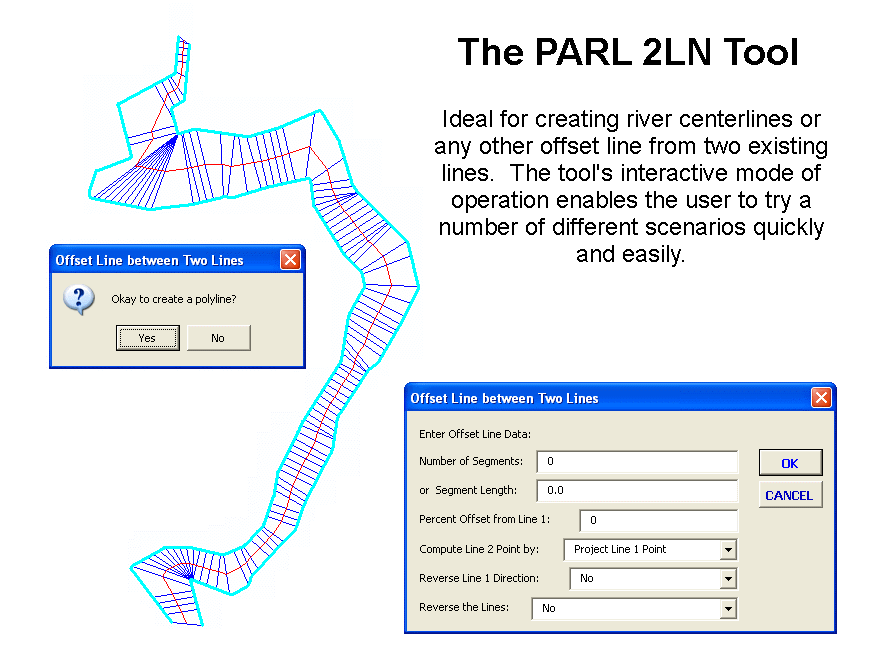
- Line offset between two existing lines (such as creating a river centerline).
- Intersections resulting in Point Creation
- Two lines by picking each line.
- A line and a curve by picking each feature.
- A line and a polygon by picking each feature.
- Two Curves by picking each curve.
- Curve can be simulated by picking a point and entering a radius.
- Two Polygons by picking each polygon.
- Editing Features
- Move a line or curve endpoint to a new location.
- Break a line or curve at a specific location.
- Extend a line or group of lines to its, or their intersection with another line.
- Extend the endpoint of a line or curve a specified distance.
- Relocate the endpoint of a line to its projection upon another line or curve.
- Cutout a line or curve element keeping the inside or outside portion.
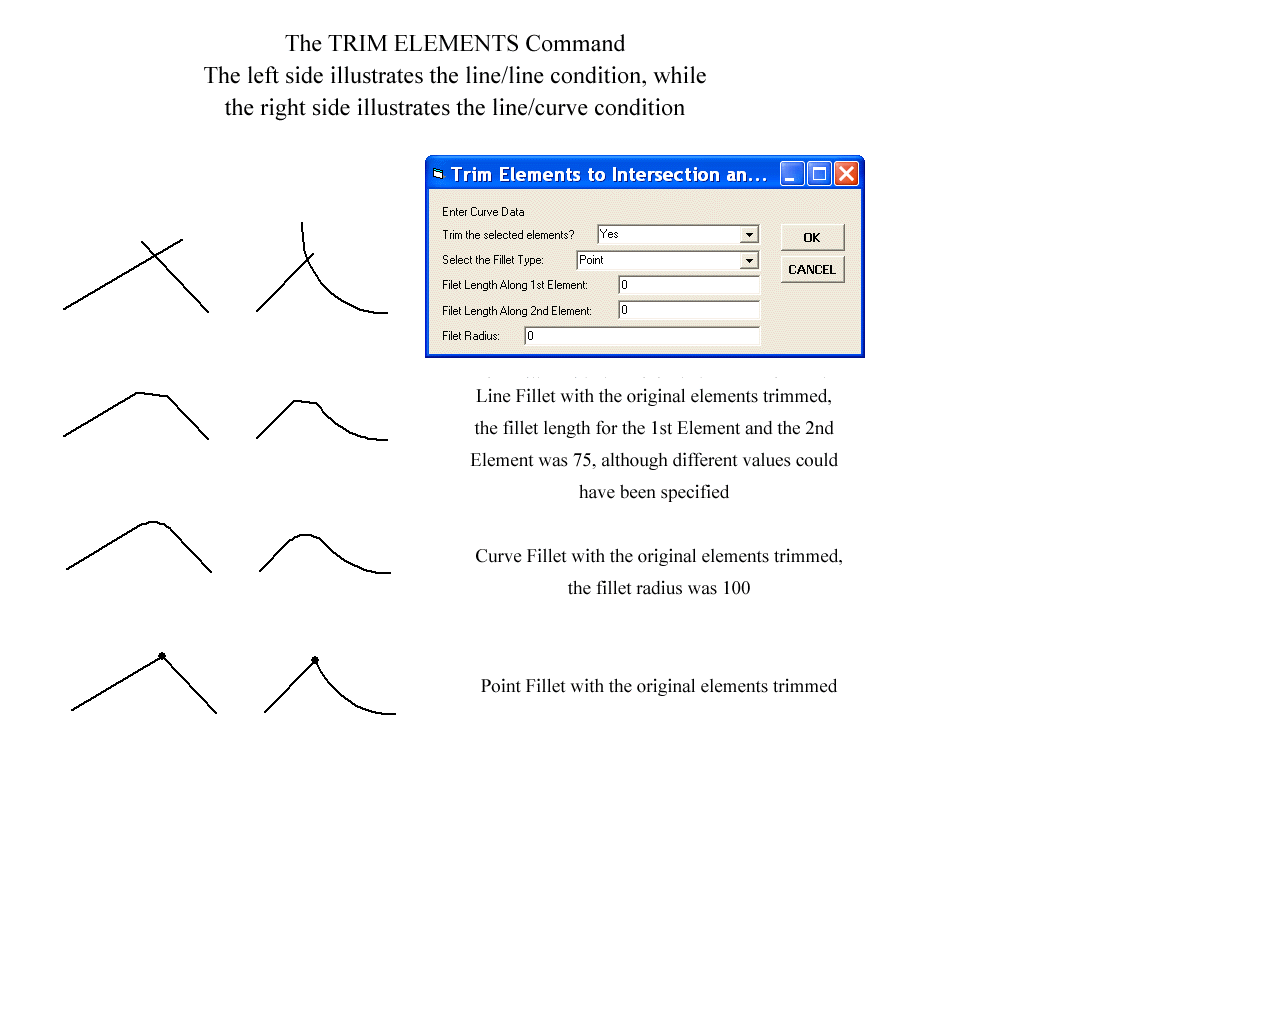
- Trim or Extend two features (two-point
lines, polylines, curves) by moving the endpoint of each feature,
closest to their intersection, and with the option of:
- Introducing a circular arc fillet.
- Introducing a line or chord fillet.
- Creating a point feature at the intersection of the two lines.
- Extend or Retract both endpoints of a two-point line or polyline to its intersection with a base line or curve.
- Ability to insert a vertex on a two-point line.
- Ability to insert, delete and relocate vertices of a polyline or polygon.
- Ability to specify the length of a line.
- Ability to specify the slope of a line.
- Reverse or flip the direction of a selected set of line features.
- Ability to change the shape of a selected feature to be that of another selected feature with the option of maintaining common attributes with the CEDRA-ChangeFeatures extension.
- Ability to change the shape of a group of selected features to be that of another group of features using a user-specified attribute to match features and with the option of maintaining common attributes with the CEDRA-ChangeFeatures extension.
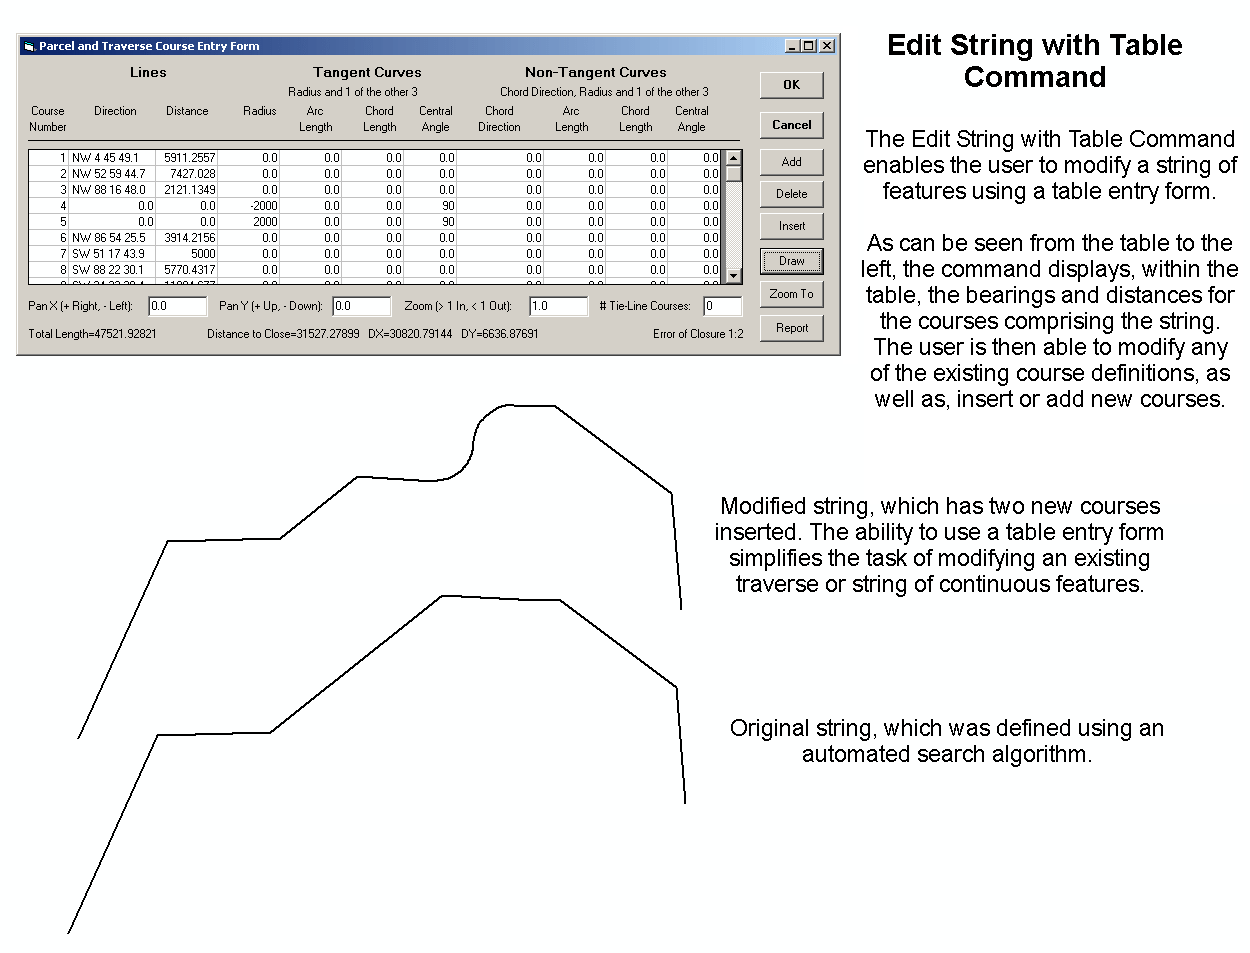
- Ability to modify a traverse or string of features using a table entry form.
- Edit Multi-Part Features in one of five modes enabling the
user to:
- Create individual features (points, lines and polygons) which represent the individual parts of the multi-part feature.
- Create two new features with one of them being the selected part and the other representing the original multi-part feature, minus the selected part.
- Create one new feature representing the selected part, as well as, altering the shape of the original multi-part feature.
- Create only one new feature which represents the selected part. The original multi-part feature is left unaltered:
- Simply delete the selected part from the original multi-part feature. No new features are created, however, the shape of the original multi-part feature is altered.
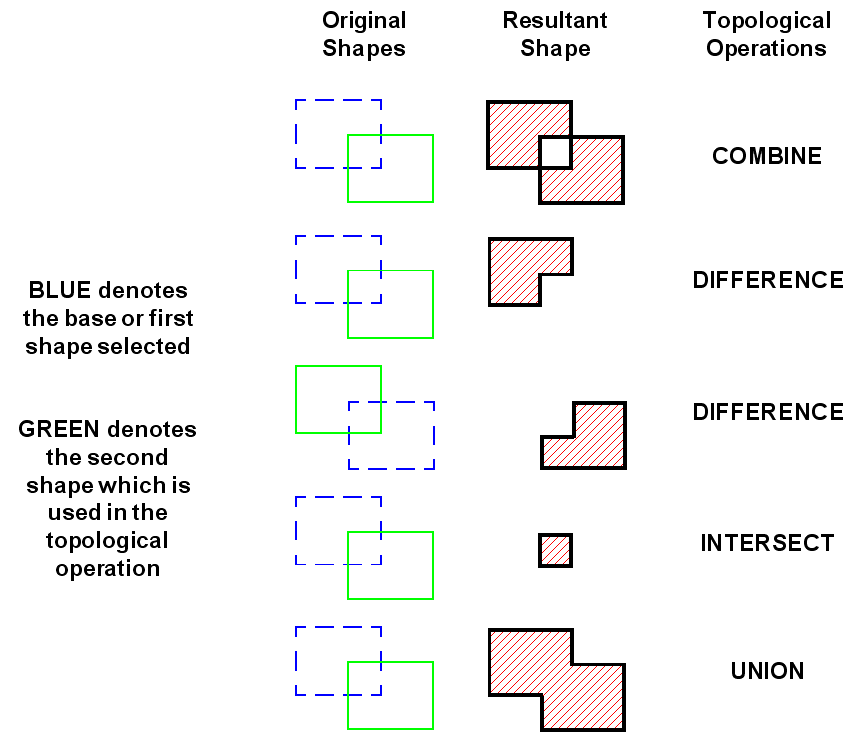
- Edit Polygons Features (single and multi-part) using any
of the available Topological Operations:
- Combine - will create a hole where Shape2 overlaps Shape1.
- Difference - will subtract from Shape1 the overlap with Shape2.
- Intersect - will create a new shape representing the overlap of Shape2 with Shape1.
- Union - will add Shape2 to Shape1.
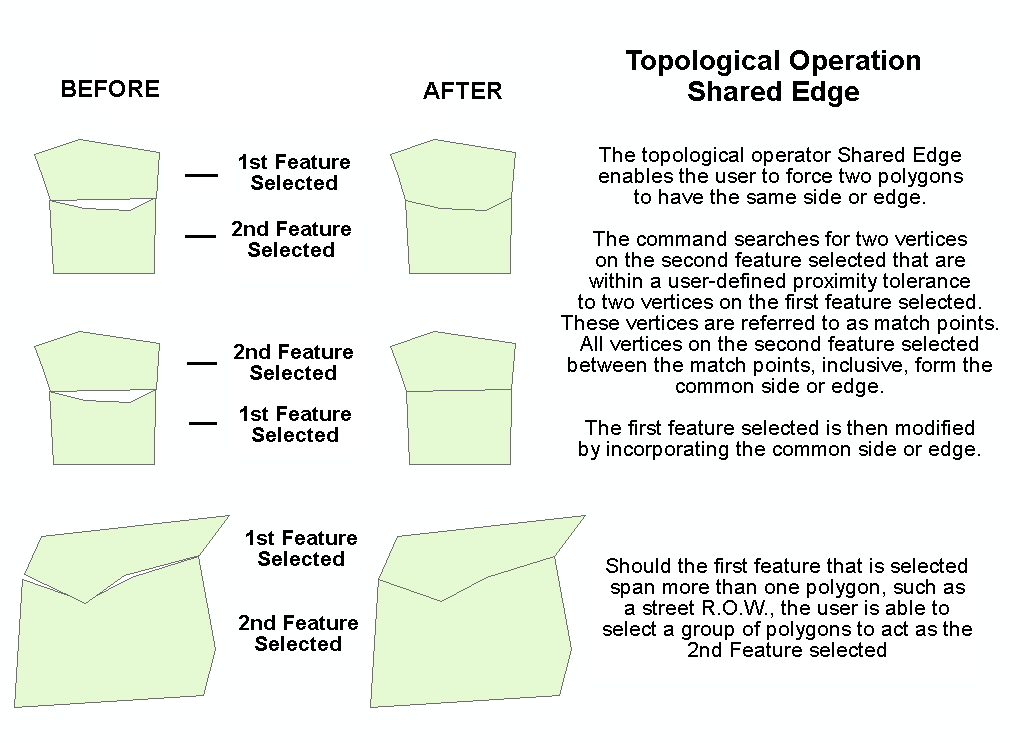
- Shared Edge - will force Shape 1 to match the common side with Shape 2. Very useful in maintaining topological databases.
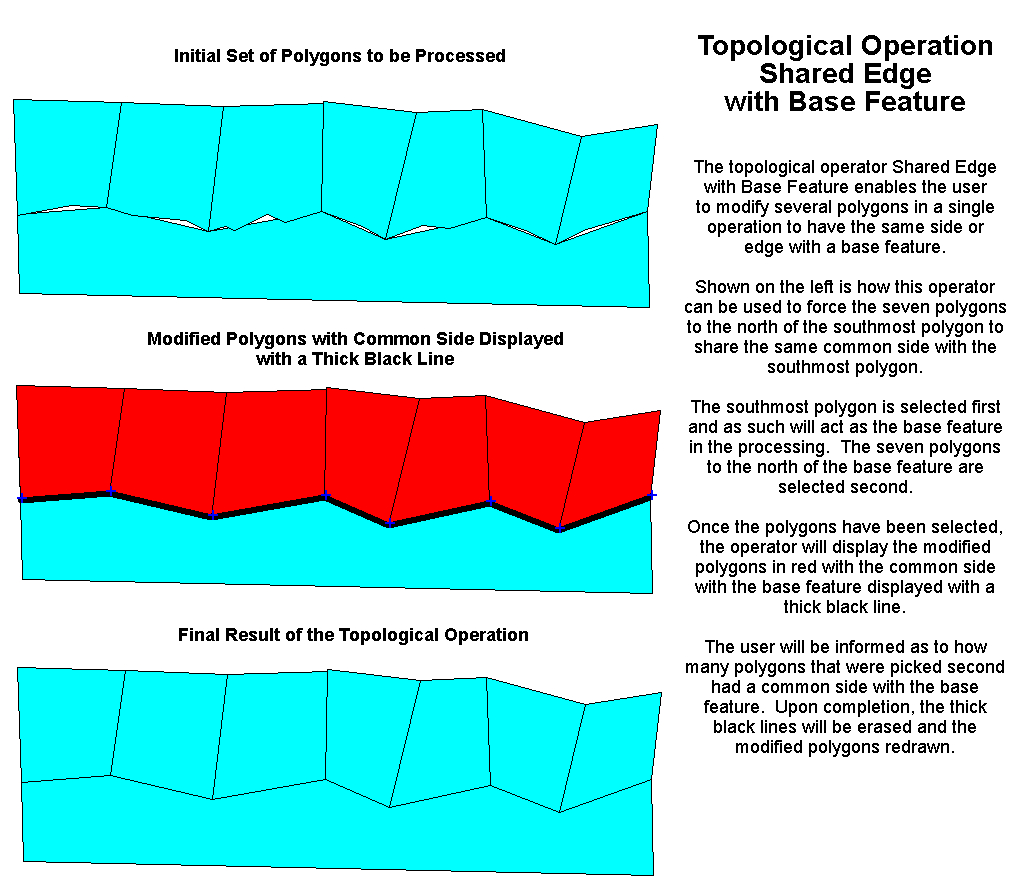
- Shared Edge with Base Feature - will force Shape 2 to match the common side with Shape 1. Very useful in maintaining topological databases.
- De-weed and smooth one or more
polylines in a single operation.
- Three de-weeding methods are provided.
- Three smoothing methods are provided.
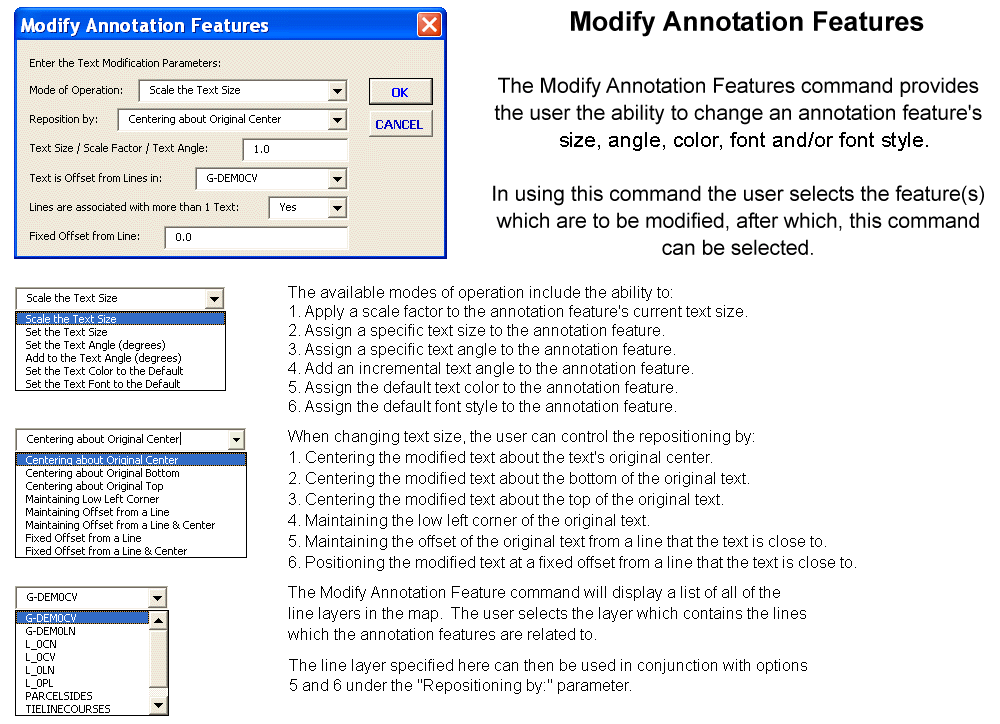
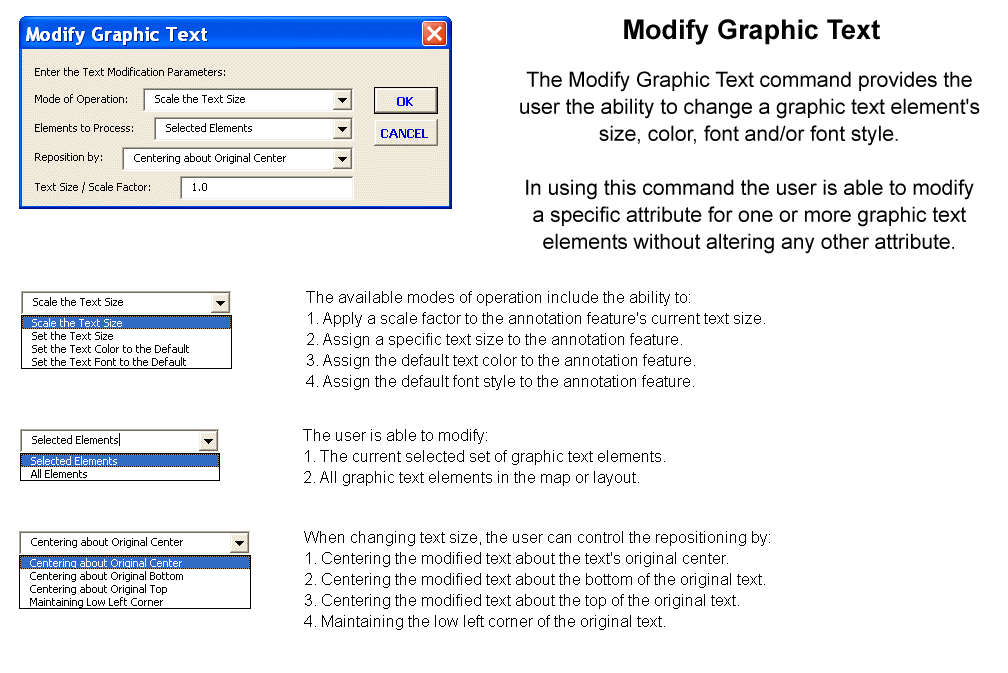
- Ability to modify a specific attribute
of one or more annotation features without altering any of their
other attributes. Attributes which can be modified include:
- Text Size,
- Angle of inclination,
- Color,
- Font,
- Font Style and/or,
- Position in relationship to a line feature by:
- Maintaining the offset from a line,
- Maintaining the offset from a line and centering the annotation along the line,
- Placing the annotation at a fixed offset from a line or,
- Placing the annotation at a fixed offset from a line and centering the annotation along the line,
- Ability to modify the text string of an annotation feature by simply selecting the annotation feature and entering a new text string.
- Ability to modify the text string of an annotation feature by using the value of an attribute that is associated with a line feature, which is in close proximity to the annotation feature.
- Ability to set the angle of an annotation feature by:
- picking two points,
- picking a line feature, or
- explicitly entering an angle in one of the following three forms: Azimuth, Bearing or Cartesian.
- Ability to break a single annotation feature into multiple annotation features (stacked text).
- Ability to populate the Z attribute of a point feature by interpolating an elevation on a TIN layer.
- Ability to populate the Z attribute of a point feature by interpolating an elevation on a layer containing contour strings which have an elevation value assigned to them.
- Ability to populate the Z attribute of a point feature by interpolating an elevation on a layer containing 3D polygon features.
- Ability to populate the Z attribute of a point feature by interpolating an elevation on a layer containing 3D polyline features. Note that this command will take into account the elevation values associated with each of the intermediate vertices. That is to say, the elevation value that is computed is not based upon the polyline's start and end point elevations but rather the elevations associated with the end points of the segment within the polyline that the point falls within.
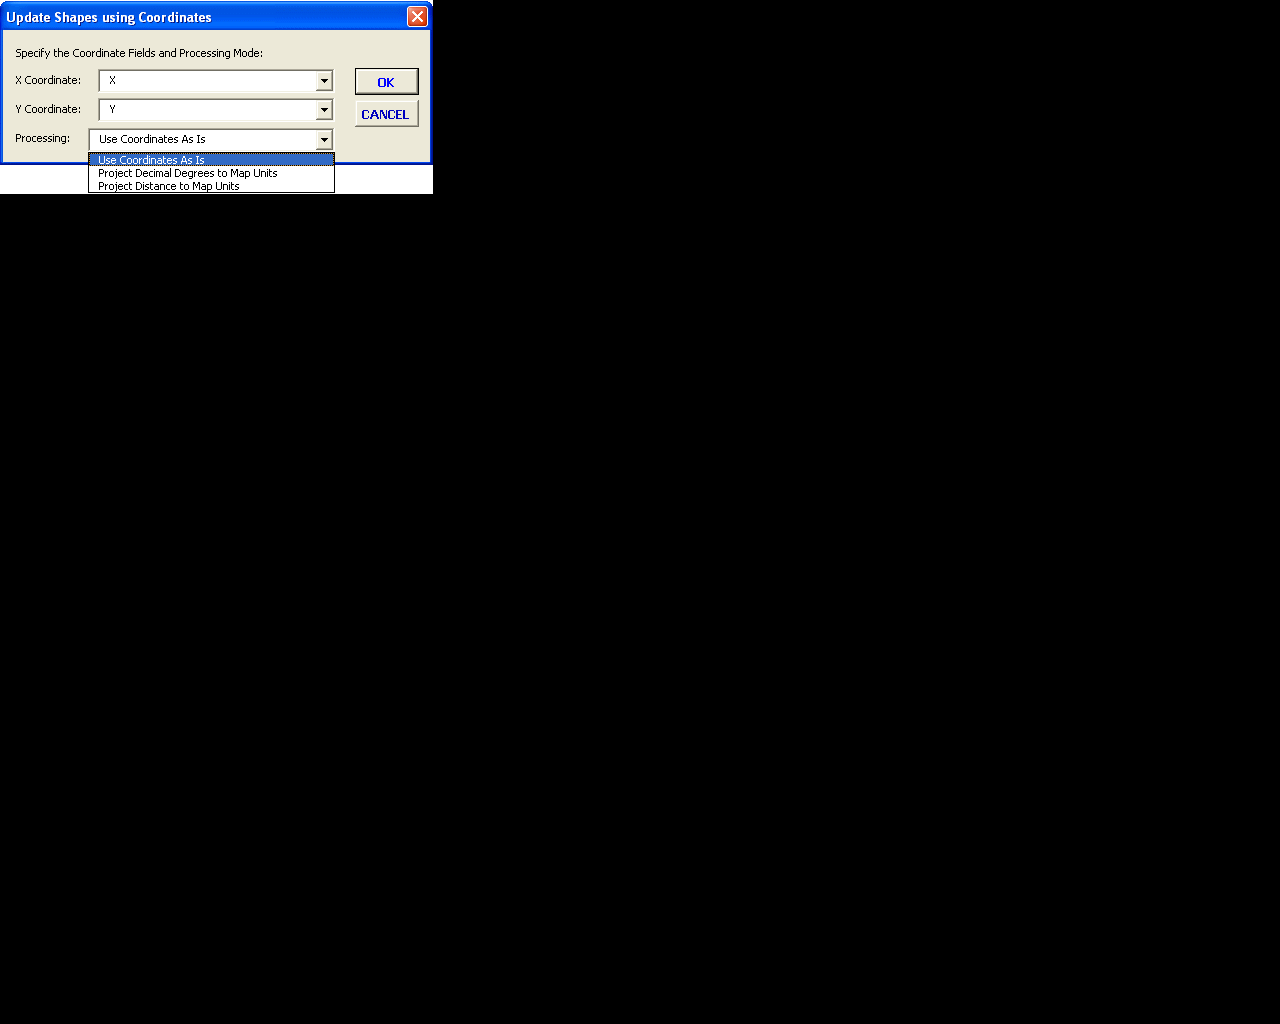
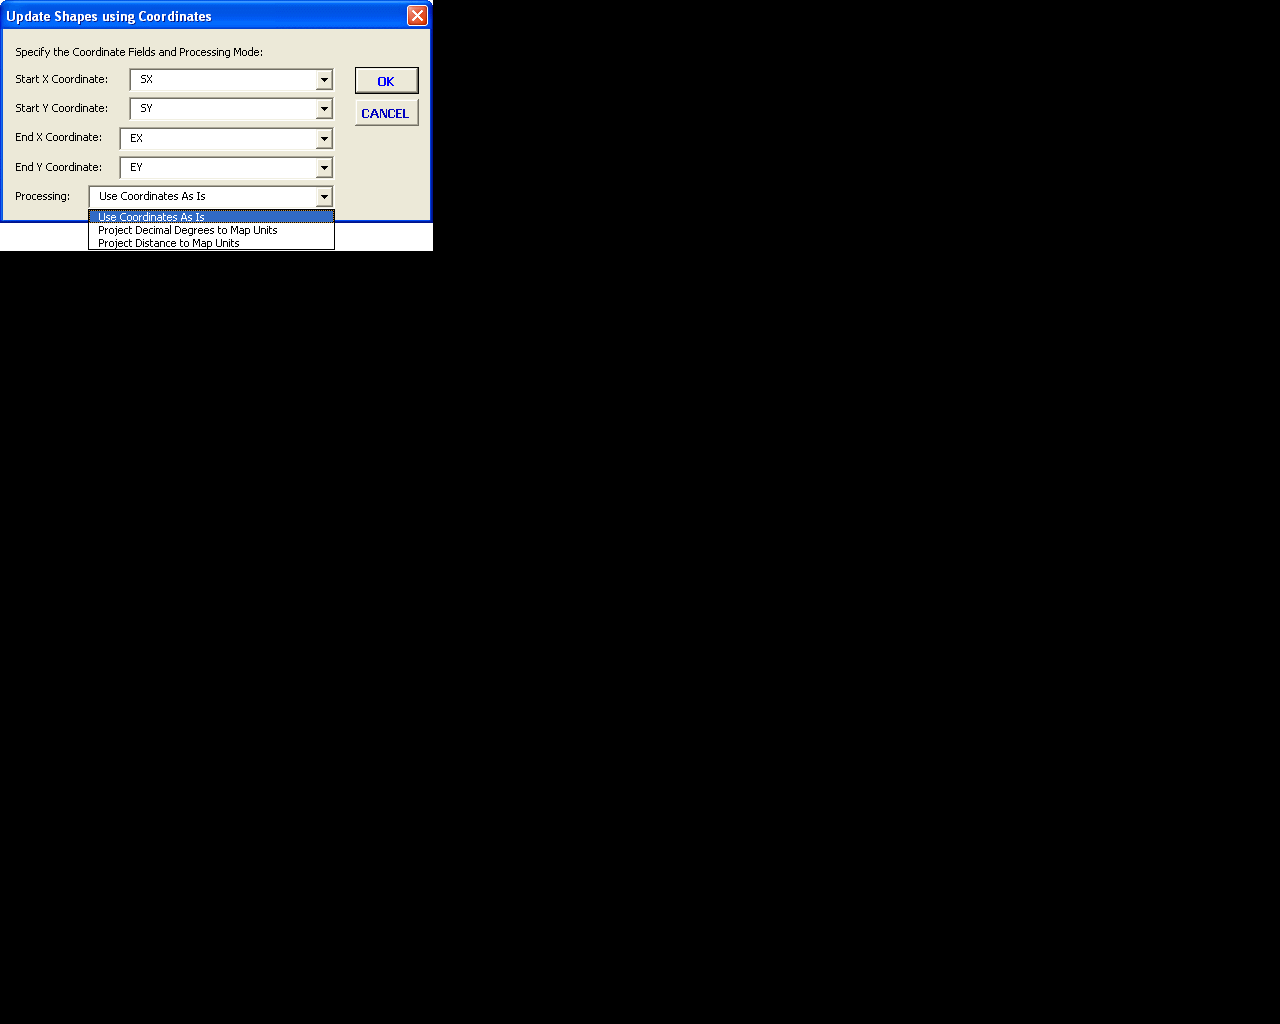
- Ability to change the shape of a point
or polyline by using coordinate values
stored in the feature's attribute table. Coordinates can be processed
by:
- using the coordinate values as is,
- projecting decimal degrees values into the Data Frame's map units, or
- projecting coordinate values in the Data Frame's distance units into the Data Frame's map units.
- Ability to edit coordinates of a point feature in its attribute table and have the shape altered.
- Ability to change a line into a curve and vice-versa.
- Ability to parse the line segments comprising a polygon or
polygon feature and convert those segments
representing a curve into a curve with the ability to:
- reshape the feature,
- generate line and curve features which represent the courses comprising the feature's geometry, or
- edit the individual courses comprising the feature's geometry using the Parcel and Traverse Course Entry Form.
- Ability to create polyline/polygon vertices from point features.
- Ability to force shared vertices to be identical based upon a user-specified proximity value.
- Tranformations
- Relocate, translate, rotate and/or scale individual and groups of points, lines, curves and text.
- Stretch groups of points, lines, curves and text using three control points.
- Echoing of Feature Data
- Display the distance and direction of two picked points.
- Display the distance and direction of a selected line feature.
- Display the curve data associated with a selected curve feature.
- Display the perimeter and area of a selected polygon feature.
- Display the central angle, radius and pertinent curve data given three picked points (center, start point and end point of a curve).
- Display the perimeter and area of a selected string of features.
- Display the plus and offset of a point along a string, as well as, the overall length of the string.
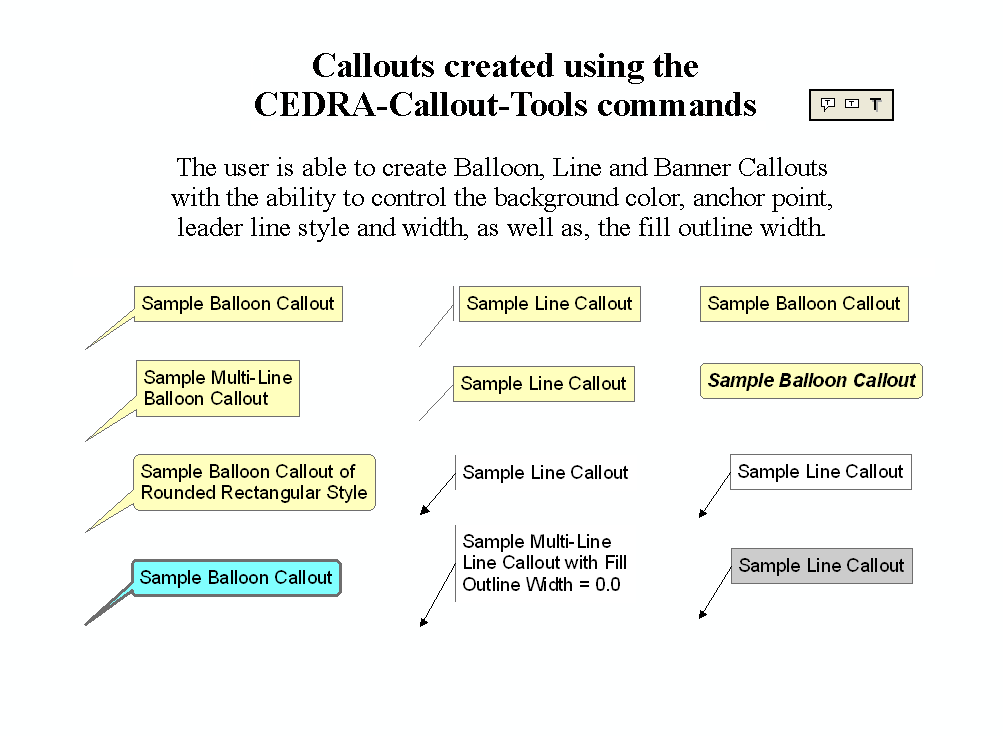
- Callout Creation
- Ability to create Balloon callouts
with the ability to control:
- the fill color,
- the fill outline width, and
- the callout style (rectangle or rounded rectangle).
- Ability to create Banner callouts
with the ability to control:
- the fill color,
- the fill outline width, and
- the callout style (rectangle or rounded rectangle).
- Ability to create Line callouts
with the ability to control:
- the leader line line style,
- the leader line width,
- the gap between the leader line and the fill,
- the fill color, and
- the fill outline width.
- Ability to create Balloon callouts
with the ability to control:
- Generic Functionality
- Button selection for specifying:
- Azimuth, Bearing or Cartesian directions.
- Radial or traverse creation of points and lines.
- Point snapping across all visible layers (themes).
- Point snapping tolerance can be specified as:
- a percentage of the view display width, or
- as an absolute value.
- Layer control (theme in which new features will be stored in).
- US or Metric units of measure.
- Ability to enter an Azimuth direction even though a Bearing direction may be requested.
- Ability to enter a Cartesian direction even though a Bearing direction may be requested.
- Ability to enter a Bearing direction even though an Azimuth direction may be requested.
- Ability to enter a Bearing direction even though a Cartesian direction may be requested.
- Ability to customize the default Property settings such as units of measure, point snapping, etc.
- Ability to copy features with or without their attributes:
- into another theme.
- into an SDE database.
- Display distance, central angle, deflection angle, arc lengths and/or area of user "picks".
- Display geometric attributes of a selected feature.
- Dimensioning including leaders, normal, vertical and horizontal dimensions.
- Undo an operation even if features span multiple themes.
- Auto-search or trace to select features.
- Delete in mass a group of selected features.
- Button selection for specifying:
Attribute Specification
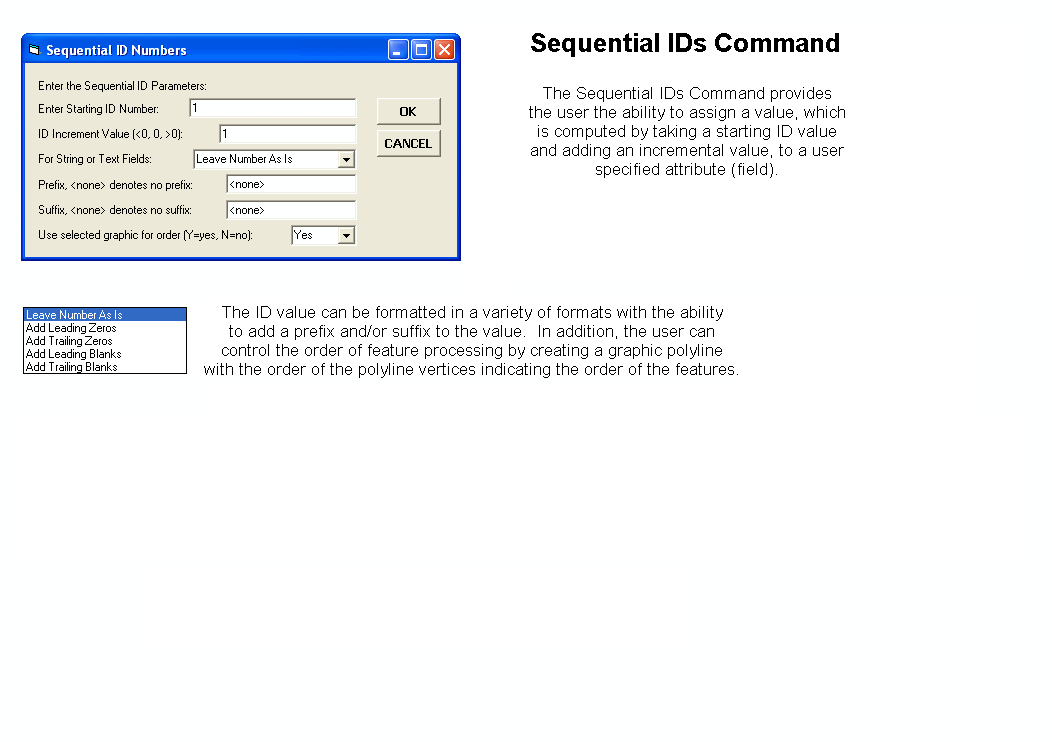
- Using the Sequential IDs command
the user has the ability to assign a value
which is computed by taking an initial value and adding an increment
with the ability to:
- include a prefix.
- include a suffix.
- specific the order of feature assignment using a selected graphic (polyline).
- Using the Assign Attribute command
the user has the ability to assign a value
to an attribute for all features or a set of selected features
in the current active layer. The value can be specified:
- explicitly,
- picked from a list of unique attribute values, or
- by using the value from another attribute (field).
- Using the Edit Feature command
the user can display a feature's attributes within:
- a series of multi-input dialog boxes in groups of 10,
- with the ability to advance or return to previous groups, using
- the name of the attribute or alias, if one has been assigned.
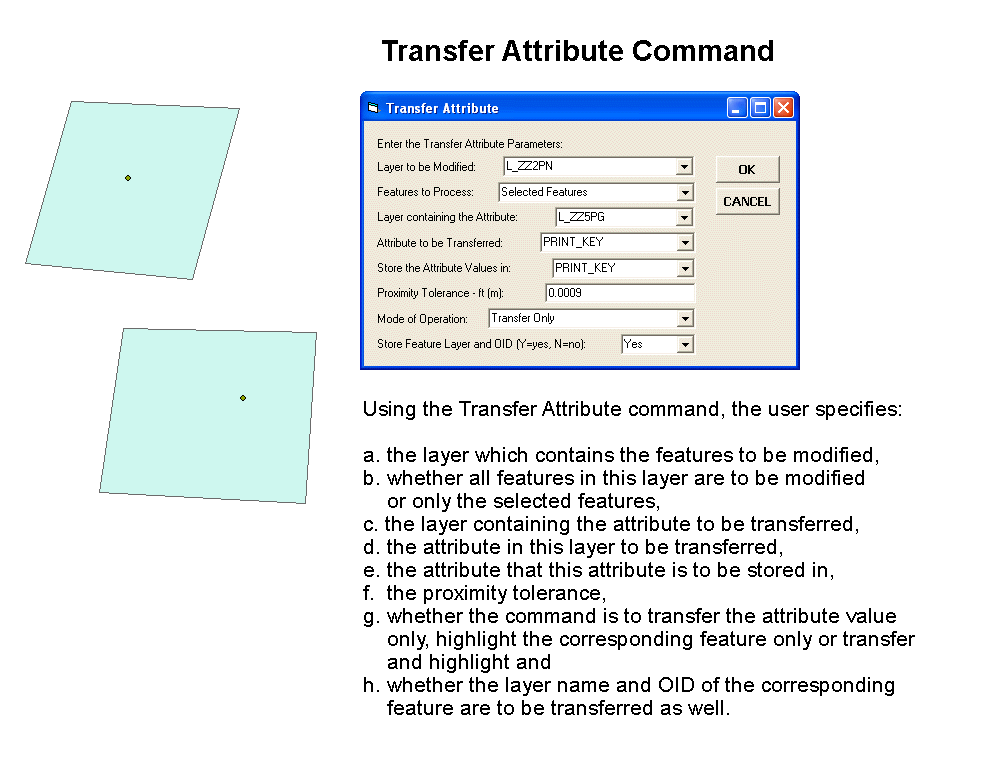
- Using the Transfer Attribute command
the user can:
- transfer attributes from one layer to another based upon
a spatial relationship:
- features within a user-specified proximity value to a point feature,
- lines features close to other line features, or
- features which fall within a polygon feature.
- highlight the features which satisfy a spatial relationship or
- transfer and highlight the features which satisfy a spatial relationship.
- transfer attribute value(s) with the option of including a prefix and/or suffix.
- An example of the application of this command is when there are two layers, a point layer and a polygon layer. The polygon layer contains an attribute called PRINT_KEY and it desired to transfer the PRINT_KEY value of a polygon feature to a point feature which falls within a specific polygon.
- specify a Transfer Attribute File which contains the fields to be processed thereby increasing command efficiency and greatly reducing the potential for error.
- transfer attributes from one layer to another based upon
a spatial relationship:
- Using the CEDRA-DataEditor software, which is included with the CEDRA-AVcad software.
- Ability to transfer up to two attributes from a point feature to a line feature by determining the closest point feature to each end point of the line. This is ideal for those applications where the user wishes to store a node number for the start and end points of a line, where the node number is an attribute or the OID of a point feature. In addition to the node number, the user can optionally identify a second attribute (such as node type, the name of the layer that the point is stored in, etc.) to be stored in the line's attribute table.
- Ability to store the sequential index value of a feature in a string of features as an attribute value.
- Ability to store the distance to the start point of a feature in a string of features as an attribute value.
- Ability to store a Point's X, Y, Z coordinates in user-specified fields.
- Ability to store a Line's start and end point coordinates, length and direction (azimuth, bearing, cartesian) in user-specified fields.
- Ability to store a Polygon's centroid coordinates, perimeter and area (sf/sm and acres/hectares) in user-specified fields.
Copying functionality
- Ability to copy selected point, line, or polygon features
which reside in one or more shapefiles into:
- another shapefile, or
- a geodatabase.
- Ability to copy selected point, line, or polygon features
which reside in one or more geodatabases into:
- a shapefile, or
- another geodatabase.
- Ability to copy selected point, line, or polygon features
which reside in one or more DWG or DXF drawings into:
- a shapefile, or
- a geodatabase.
- Ability to copy selected point, line, or polygon features
which reside in an Arc/Info coverage into:
- a shapefile, or
- a geodatabase.
- Ability to copy annotation features which reside in a DWG
or DXF drawing into:
- a geodatabase.
- Ability to copy annotation features which reside in an Arc/Info
coverage into:
- a geodatabase.
- When copying features, whether it is into a shapefile or
a geodatabase, the user has the ability to:
- introduce into the shapefile or geodatabase, which is to accept the features being copied, any attributes, which are associated with the features being copied, that are missing from the shapefile or geodatabase.
- convert the AutoCAD special code, %%d, for a degree symbol into a true degree symbol.
- convert the Arc/Info special code, ^, for a degree symbol into a true degree symbol.
- specify a field mapping file, which contains three arguments
per data line, enabling the user to:
- specify the name of the field in the layer from which the features are to be copied,
- specify the name of the field in the layer that will contain the features to be copied and which corresponds to the field name specified in the first argument. These field names do not need to be the same and
- specify an optional attribute equation which should be evaluated to establish the value to be stored under the field name specified in the second argument.
Mirroring functionality
- Ability to mirror selected point,
line, polygon and/or annotation features from different data
sources to create new features in:
- the same data source as the selected features,
- another shapefile, or
- a geodatabase.
- Mirroring can be performed about the:
- X axis,
- Y axis, or
- an arbitrary Baseline.
- Attributes of the selected features which are mirrored will be transferred to the new features which are created as long as the layer that the new features are stored in have the same attributes as the selected features.
Repeating functionality
- Ability to repeat selected point,
line, polygon and/or annotation features from different data
sources to create new features in:
- the same data source as the selected features,
- another shapefile, or
- a geodatabase.
- When repeating a set of selected features, the user to able
to:
- create multiple copies,
- apply a scale factor, and/or
- apply an angle of rotation.
- Attributes of the selected features which are repeated will be transferred to the new features which are created as long as the layer that the new features are stored in have the same attributes as the selected features.
Querying functionality
- Ability to specify an attribute query:
- Against one or more layers in a single operation, and if desired
- Zoom to the extents of the selected features immediately after the query has been made.
Spatial Querying functionality
- Identify duplicate features in a layer with the ability to:
- Highlight the duplicate features.
- Delete the duplicate features.
- Transfer the common attribute values.
- Specify if the duplicate features are to be based upon: (a) common geometry or (b) common geometry and attribute values.
- Identify duplicate features between two layers (Layer A and
Layer B) with the ability to:
- Highlight the duplicate features in Layer A.
- Delete the duplicate features from Layer B.
- Add the attributes from Layer B which do not exist in Layer A and transfer the attribute values from Layer B to Layer A.
- Transfer the common attribute values from Layer B to Layer A.
- Identify the polygons which overlap a set of selected polygons in a layer.
Layout/Data Frame Manipulation functionality
- Ability to preserve the position of Dara Frames and Graphic
Elements in Layout View as a Layout Definition.
- For Data Frames, the position of the data frame as well as the map scale and extent is preserved in a table called LayoutData.
- For Graphic Elements, the position of the graphic element is preserved.
- Ability to recall a Layout Definition.
- All Data Frames are returned to their position and map extent at the time the Layout Definition was created.
- All Graphic Elements are returned to their position at the time the Layout Definition was created.
- Ability to delete a Layout Definition.
- The above functionality is ideal for creating an ArcMap document file with multiple layouts.
- The ability to modify the Data Source Path Name for Layers
and Tables by specifying a string to be modified and the string
to replace the string to be modified. This functionality is available
for:
- Shapefiles.
- Personal GeoDatabase layers.
- File GeoDatabase layers.
- CAD Feature layers.
- Rasters.
- TINs.
- dBase Tables.
Parcel Mapping functionality
- Deed Transcription with the CEDRA-Deed
extension providing the user the:
- Ability to define line courses given bearing and distance.
- Ability to define line courses given azimuth and distance.
- Ability to define non-tangent curve courses given a chord direction, a chord length and a radius.
- Ability to define tangent curve courses given a chord length and a radius.
- Ability to define tangent curve courses given a central angle and a radius.
- Ability to define tangent curve courses given an arc length and a radius.
- Ability to change the display of the view while entering courses.
- Deed transcription using the Parcel and Traverse Course Entry Form
which provides the ability to:
- Create line, tangent curve and non-tangent curve courses.
- View all of the courses, including the tie-line, which comprise the parcel or traverse in a table with a scroll bar.
- Modify a course description and have the parcel or traverse redrawn without terminating the deed transcription session.
- Easily insert a course without having to re-enter previous course data.
- Change the view during the deed transcription process.
- Zoom to the extent of the parcel or traverse.
- Display the error of closure as a ratio of the overall parcel or traverse length divided by the closure distance.
- Display the error of closure as a distance and as DX and DY values.
- Display the error of closure ratio (i.e. 1:5000, 1:10000, etc.).
- Create a formal report of the courses which have been defined that can be printed or viewed in any word processor or text editor.
- Ability to split, combine and union polygon features.
- Ability to split or subdivide a polygon
into equal area parts by specifying: (a) the number of parts
or a minimum desired area, (b) clipping angle and (c) one of
the following methods:
- Cross-Hatch
- Inclined Plus 90
- Random
- Row/Column
- Row/Column - Area
Parcel Closure Adjustment
- Ability to adjust open or closed traverses.
- Crandall, Compass, Transit and Least Squares adjustments with formal report generation.
Aliquot Parts/Parcels
- Support of section identifier:
- ALL
- Support of quadrant identifiers:
- NE SE SW NW
- Support of half section identifiers:
- N2 E2 S2 W2
- Support of individual parcel/lot identifiers:
- NENE NESE NESW NENW
- SENE SESE SESW SENW
- SWNE SWSE SWSW SWNW
- NWNE NWSE NWSW NWNW
- Support of North/South/East/West half quadrant identifiers:
- N2NE N2SE N2SW N2NW
- E2NE E2SE E2SW E2NW
- S2NE S2SE S2SW S2NW
- W2NE W2SE W2SW W2NW
- Support of North/South and East/West half section identifiers:
- N2N2 E2E2 N2S2 E2W2
- S2N2 W2E2 S2S2 W2W2
- Support of strip identifiers with the ability to specify
the strip width value:
- North South East West
- Ability to create a multi-part polygon with a single description.
The example below results in a three part feature being created.
The comma character delineates the individual parts.
- NE NE ,SW ,SE SE
- Ability to mass create polygons
based upon an Aliquot description that is stored in an attribute
of a table. Note the following:
- the user must load a dBase table (.dbf) into the data frame and activate or select a layer which may be of polyline or polygon type (the active layer),
- this active layer represents the sections or grids for which the Aliquot descriptions pertain to,
- the dBase table must contain three fields representing the Township, Range and Section values for the section or grid to be subdivided. The active layer must also contain these same three fields,
- the selected records in the dBase table are processed, if there are none, then all records in the table are processed,
- as a record is read from the table, the active layer is searched for a match on the Township, Range and Section values which were read from the table record,
- if there is only one match then it is this section or grid that is subdivided, if there are no matches or more than one match, then the table record is ignored and the next record in the table is processed,
- the user has the option to transfer attributes or fields from the dBase table to the current active layer which will contain the polygons that are created.
- Ability to parse Aliquot descriptions in a left to right or right to left order.
Importing functionality
- dBase, Info, SDE and ASCII files may be directly read.
- Access, Paradox, FoxPro, Oracle, Sybase, Informix, DB2, Ingres
by:
- Exporting to dBase or ASCII for direct reading or,
- accessing through ODBC - Open Database Connectivity.
- any ODBC/SQL-compliant database.
- Import of PC Arc/Info coverages, Arc/Info coverages and libraries.
- Direct reading of Shapefiles.
- DXF, DWG, DGN and CEDRA CAD drawings.
- VPF, MapInfo, Atlas GIS and ASCII map data.
- Ability to have comments within the ASCII files that are processed for mass importing.
- Ability to mass import polygons from an ASCII file.
- Ability to mass import points in a variety of formats from an ASCII file.
- Ability to mass import lines that are defined by node numbers from an ASCII file.
- Ability to mass import polylines that are defined by a line ID value and vertex coordinates from an ASCII file.
- Ability to import a CEDRA "COGO" file which is
an ASCII file that allows the user to mass import:
- Lines given a direction and a distance.
- Polygons given a direction and a distance for each course (side) comprising the polygon. The polygons may also contain curves (simple, compound and reverse) rather than just straight line sides.
- Non-Tangent Curves given a chord direction, a chord length and a radius.
- Tangent Curves given a chord length and a radius.
- Tangent Curves given an arc length and a radius.
- Tangent Curves given a central angle and a radius.
- Ability to display the following raster file formats:
- TIFF (.tif files).
- ERDAS (Rev 7.3 and 7.4 .lan and .gis files).
- IMAGINE (.img files).
- BSQ, BIL and BIP.
- Sun Rasterfiles (.rs, .ras, and .sun files).
- BMP.
- JPEG (.jpg files).
- IMAGINE (.img files).
- Arc/Info GRID.
- RLC (Run-Length Compressed format).
Exporting functionality
- Ability to export features (points,
lines, polygons and annotation) as an Arc/Info Generate File.
- In the form of a single Generate file, or
- As multiple Generate files using the layer name as the name of the file.
- Ability to export features (points,
lines and polygons) in the form of a Vertex Coordinate File.
- In the form of X,Y coordinates,
- In the form of North,East coordinates,
- In the form of Longitude,Latitude coordinates, or
- In the form of Latitude,Longitude coordinates.
- Ability to export features (points, and multi-points) in a variety of ASCII based formats.
- Ability to export features (points, lines, polygons and annotation) in the form of a DXF File.
- Ability to export features (polylines and polygons) adhering to the Traverse File Format.
Graphic display manipulation
- Advance or return to previous views.
- Ability to save and assign a name to an unlimited number of views.
- Ability to return to a previous view by specifying a view name.
- Ability to zoom in or out of a view by specifying a scale factor.
- Individual and global text scaling.
- Individual and global text editing.
- Viewing of ASCII based files.
- Customized selection tools for ArcGIS users.
- Ability to modify a specific attribute of one or more graphic text elements without altering any of their other attributes.
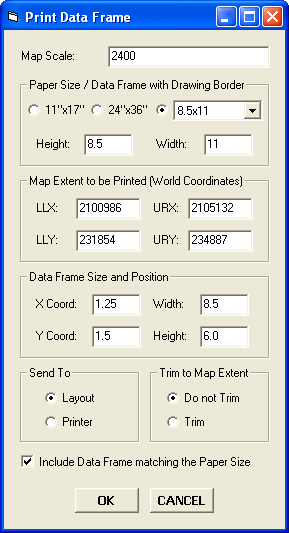
Printing Capability for ArcGIS
ArcGIS® users have the ability to print the active data
frame using the Print Data Frame command, which is available in
the CEDRA-DataFrame-Tools toolbar. The Print Data Frame command
differs from conventional ArcGIS printing in that the user is
able to control: (a) the map scale, (b) the map area to be printed,
(c) the location of the map on the paper and (d) optionally, whether
a data frame, which contains a map sheet border, should be included
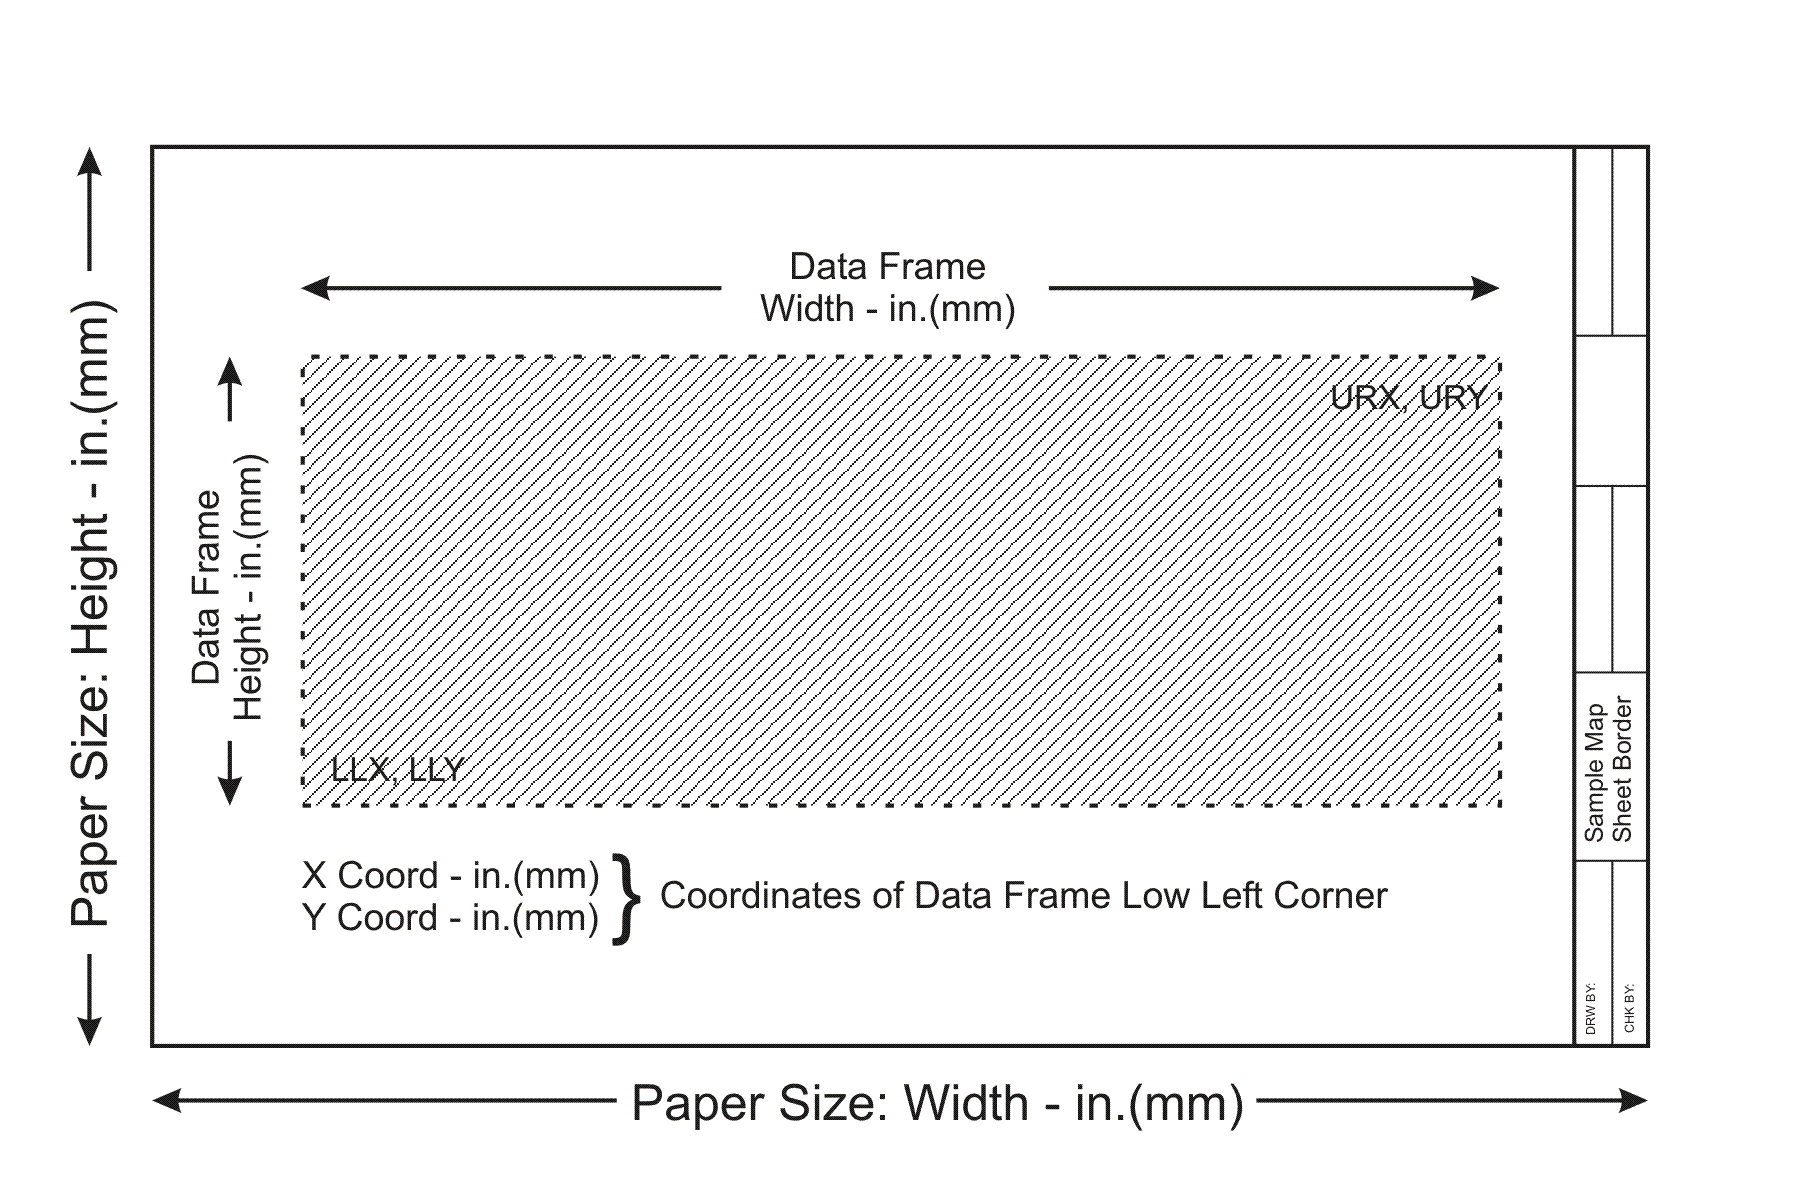
or not in the map.
As most ArcMap users have realized, within an ArcMap document
file (.mxd) all data frames share the same layout. This causes
the difficulty of when the layout view is activated all of the
data frames in the document file appear in the layout, which for
some applications is not what the user wants. The Print Data Frame
command will print the active data frame, from data or layout
view, ensuring that: (a) the desired map scale is preserved, and
(b) all other data frames do not appear on the plot. This is achieved
by programmatically positioning all data frames, other than the
active data frame, in the document file outside of the user specified
sheet limits (Paper Size parameters). In so doing, when the layout
view is activated the only data frame that appears in the layout
view is the active data frame.
This capability allows the user to have a single document file
that contains many data frames with each data frame containing
a complete drawing sheet. Without the Print Data Frame command
the user would have to: (a) create separate document files for
each drawing sheet or (b) manually reposition all data frames,
other than the active data frame, outside of the sheet limits.
|
|
|
|
|
|
In addition, users have the ability to operate in another mode
of map preparation. The first mode, which was described above,
is when a single data frame contains the entire map to be printed.
The second mode is where one data frame contains the map contents,
while another data frame contains the map border (title block,
sheet border, etc.).
The Print Data Frame command accommodates this scenario by providing
the Include Data Frame matching the Paper Size option.
When this option is checked the Print Data Frame command will
position the active data frame according to the specifications
in the Data Frame Size and Position parameters area and will include
in the plot the data frame whose name is either 11"x17",
24"x36" or Custom, depending upon which Paper Size is
active. This approach enables the user to create a single map
border, placing it in a data frame using one of the following;
11"x17", 24"x36" or Custom
as the name of the data frame, and generate multiple maps without
having to load the map border into multiple data frames.
DXF Export Capability for ArcView GIS and ArcGIS
ArcView® GIS and ArcGIS® users have the ability to create a DXF file, from within ArcView 3.x or ArcMap, for all visible features in the current map. Unlike other DXF export utilities, which process only one theme at a time, the CEDRA DxfExportTM extension processes all visible themes (shapefiles, personal geodatabases, enterprise geodatabases and coverages) in the current map. In addition, the CEDRA DxfExport utility will process annotation features and graphic text elements. As such, a DXF file created by this utility can include features and text. In processing the visible layers in the map:
- If a theme has selected features then only the selected features will be processed, if there are no selected features then all features in the theme will be processed, this includes point, polyline and polygon features. If the option Export Features displayed in the Current Extent is selected then all visible features in the current view will be exported regardless of the feature's selection state.
- If a theme has labels, the labels will need to be converted into annotation, using the Convert Labels to Annotation... command, in order for the labels to be exported. The labels that are converted can be stored either in a personal geodatabase or in the map, depending upon the user's preference.
- If there are selected MARKER, PEN, FILL and/or TEXT graphic
elements then these graphic elements will be processed (if the
user desires). If the view does not contain any selected graphic
elements then no graphic elements will be processed. In exporting
graphic elements note the following:
- All of the selected Marker elements will be placed in a layer called GrapMrkr,
- All of the selected Pen elements will be placed in a layer called GrapPen,
- All of the selected Fill elements will be placed in a layer called GrapFill, and
- All of the selected Graphic Text elements will be placed in a layer called GrapText.
- The name of the theme will serve as the name of a layer in the DXF file.
- Non-alphanumeric characters in a theme name are converted to the underscore character (_).
- The user has the ability to select one or more attributes, from a choice box that appears in the Create DXF File dialog box, for inclusion in the DXF file, if desired. When exporting attributes, the selected attributes will appear as "blocks" in the DXF file. These blocks will appear at the midpoint of the feature and the name of the block will be B_xxxx, where xxxx denotes the name of the layer the feature resides in. All of the attributes associated with the block will be listed vertically, one under the other. The ability to export attributes is important because: (a) it enables the user to transfer non-graphic information (attributes) into the DXF file, maintaining the association of the non-graphic information with the feature and (b) provides a mechanism for the user to maintain symbology and line styles. Regarding the latter, symbology and line styles, in the GIS classifications are based upon attributes, by exporting the attributes which the classifications are based upon, the user has the ability to regenerate the classifications in the system in which the DXF file is being read into. This, of course, is dependent upon the software which is reading the DXF file, that it has the ability to change symbology and line style using information that is stored in a "block".
| ArcMap - CEDRA-DxfExport Dialog Box |
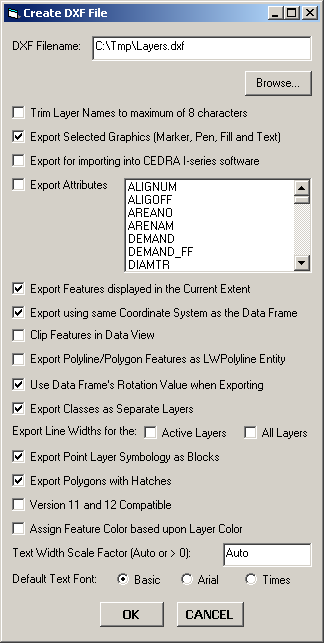 |
As can be seen by examining the dialog box above, the user is able to:
- Control the name of the DXF file that is created. The Browse... button enables the user to use a standard file navigation dialog box to control the folder where the DXF file will be written to, as well as the name of the DXF file.
- Specify whether the theme names are to be trimmed to 8 characters or not. If a check appears in the square to the left of this parameter, the names of the visible themes that are processed will be trimmed to a maximum of 8 characters. The first 8 characters of the theme name will be used.
- Specify whether selected graphic elements are to be included in the DXF file creation. If a check appears in the square to the left of this parameter any graphic elements that are selected will be included in the creation of the DXF file.
- Specify whether a DXF file for importing into the CEDRA I-series software is to be created or not.
- Specify which attributes if any are to be included in the DXF file as "blocks". If a check appears in the square to the left of this parameter all attributes which are selected in the choice box will be included in the DXF file as "blocks". There is no limit to the number of attributes that can be selected, and
- Specify whether the visible features in the current extent (view) are to be processed. If a check appears in the square to the left of this parameter then the only features that will be exported will be the visible features in the current extent, regardless of their selection state. In addition, if the Export Selected Graphics (Marker, Pen, Fill and Text) option is selected, all Marker, Pen, Fill and Graphic Text elements in the visible annotation group layers which are within the current extent will be exported, regardless of their selection state. The name of the annotation group layer will serve as the name of the layer these graphic elements are placed in.
- Specify whether the data that is exported is to appear in the same coordinate system as the current view (data frame) or not. If this option is not checked, the data that is exported will be in the coordinate system of the theme's (layer's) source data. If this option is checked, all data that is exported will be in the same coordinate system as currently displayed in the data frame.
- Specify whether features are to be clipped to the current map display extent when exporting from Data View. If this option is not checked, if any portion of a feature falls within the current map display extent, the entire feature will be exported. If this option is checked, the feature will be clipped to the current map display extent prior to exporting.
- Specify whether polyline and polygon features are to be exported as LWPolyline AutoCAD entities. If this option is checked, all polyline and polygon features will be exported as a LWPolyline entity, rather than a Polyline or Polygon entity. If a polyline forms a closed figure then a closed LWPolyline entity will be exported.
ArcView 3.x Tools for ArcGIS
ArcGIS users who have worked with ArcView GIS will notice that the commands shown below: (a) do not operate the same in ArcMap as they did in ArcView or (b) are just not a part of core ArcGIS. These commands did not provide GIS functionality but they were an essential part of how ArcView GIS users operated in the ArcView 3.x environment. To ease the transition to ArcGIS, CEDRA's ArcGIS based software includes the CEDRA-ArcView3 Tools toolbar. This toolbar enables ArcGIS users to interact with ArcMap in a manner similar to how ArcView GIS users operated in the ArcView 3.x environment. For users who have never worked with ArcView GIS, these tools provide an easier and more flexible means of interacting with the map.
| CEDRA-ArcView3 Tools toolbar |

|
Functionality offered in the CEDRA-ArcView3 Tools toolbar
- Identify features from the active layers in the Table of Contents.
- Select features from the active layers in the Table of Contents.
- De-select or clear the selected features from the active layers in the Table of Contents.
- Zoom to the extent of all layers in the Table of Contents.
- Zoom to the extent of the active layers in the Table of Contents.
- Zoom to the extent of the selected features in the active layers in the Table of Contents.
- Make all layers in the Table of Contents visible.
- Make all layers in the Table of Contents invisible.
- Delete the selected features in the map with a single click eliminating the need to (a) start the Editor, (b) select the appropriate dataset and (c) select the delete command.
- Delete a group of vertices in a selected polyline or polygon feature by defining a rectangle that encloses the vertices to be deleted.
- Open the attribute table for the selected layer(s) and/or table(s).
- Switch or reverse the selection set for the selected layer(s) and/or table(s).
- Set the current active layer (Target Layer) by picking the desired layer from an alphabetically sorted list of layer names and clicking the OK button.
For extended CEDRA-AVcadTM functionality see CEDRA-AVcogoTM and CEDRA-AVparcelTM.
To download a color brochure, which can be viewed and/or printed with Adobe Acrobat® ReaderTM, click on the following link CEDRA Software Information.
CEDRA-AVcad is licensed as per the terms of the CEDRA Software License Agreement.